Welcome!
If you are hopping along with UKScrappers you should have reached me from Ifa, but the hop started here if you have no idea what I'm talking about (there are prizes available for commenting along the way by midnight BST tonight)!Last year I decided to make a MAXI version of my Lean Mean Mini-Book with the Mystery Kit from UKScrappers Now We Are Ten Cybercrop.
Using just 2½ sheets of decent quality double-side paper and 3 sheets of cardstock, it's an eleven page, 5" square mini-book with room for 21 3"x4" photos! I blogged the pages of the book here and today I am sharing the instructions for the inner pages. It's a photo heavy post, but hopefully all will be clearer that way!
The Inner Pages
Trim 2" from one edge of two of the patterned papers and cut the remaining sheet into a 6"x12" rectangle (I used Fancy Pants About A Boy Peace, Vivid and Wild Child).
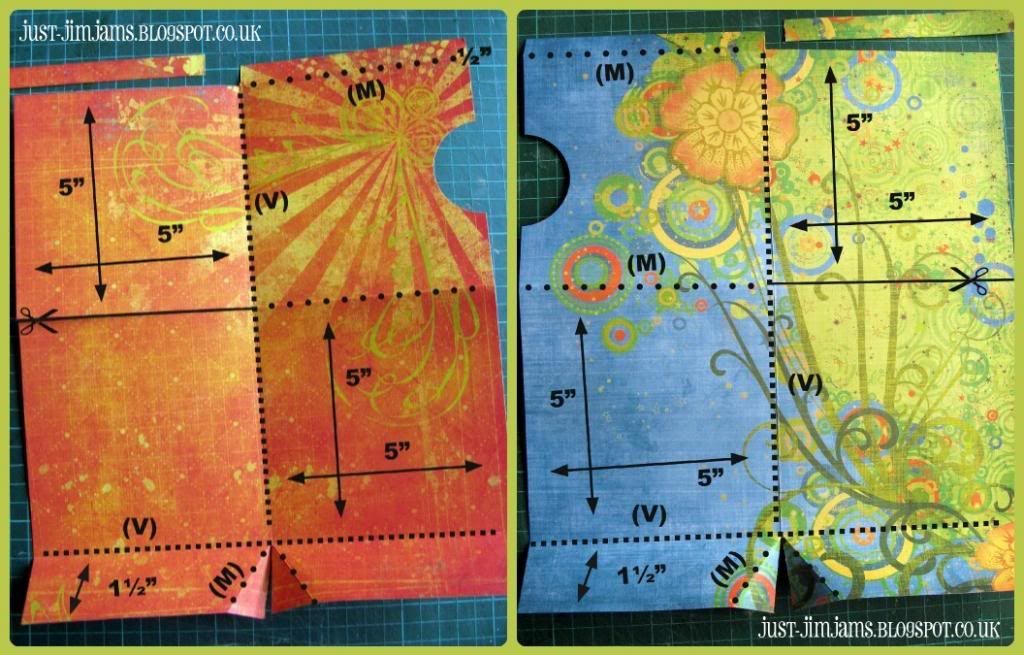
Score the two sheets of 10"x12" paper along the long centre line (5") and score three times across the width (½", 5½" and 10½"). These two sheets form the front and rear sections of the mini-book and are cut as mirror images of each other.
Remove a ½"x5" rectangle from one end of each sheet by cutting along the first width-ways score line to the central score line. Cut a semi-circle from the edge which is still intact to provide a pull-out space for a tag. Cut 5" along the middle width-ways score line on the opposite side to the semi-circle. Cut 1½" along the central score line to the third score line and fold back the corners as shown in the photo. Crease all score lines as shown in the photo.
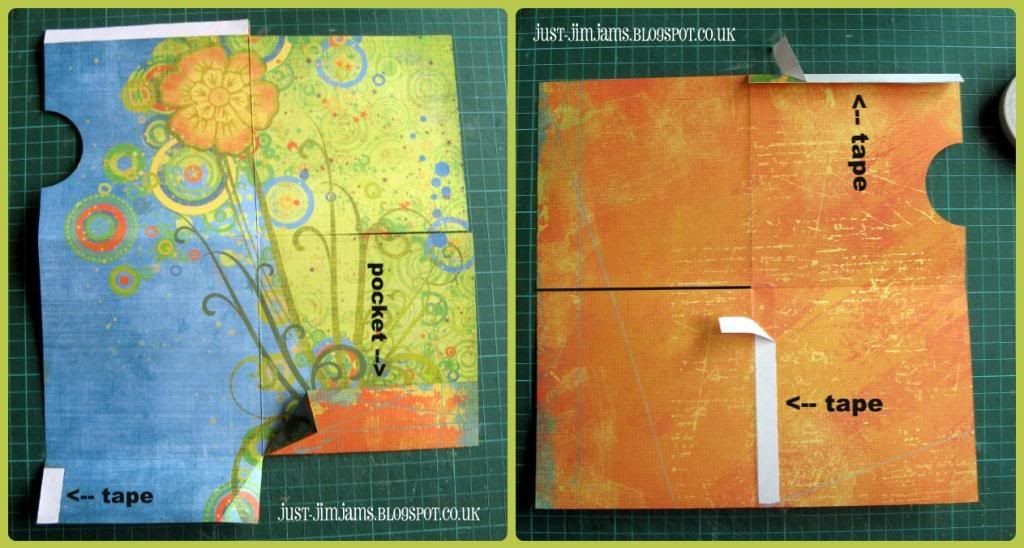
Apply adhesive (I've used double-sided tape) along the small flap at the top of the sheet. Apply adhesive to the outer edges of the bottom flaps and fold upwards to create pockets. Turn the sheet over and apply tape to the same side of the central score line as the top flap & punched semi-circle. Fold the sheet in half (from top to bottom) to form a concealed pocket with a semi-circular cut-out.
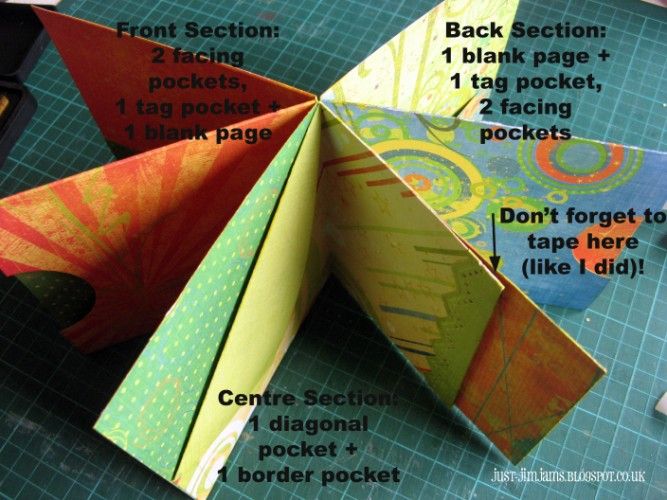
This completes one set of pages for the mini-book (the back pages of mine): containing a plain page, a pocket page with semi-circular cut-out and a double page with facing pockets.
Repeat with the other scored & cut sheet (remembering that you are working on the mirror image) to form another set of pages: a double page with facing pockets, a pocket page with a semi-circular cut-out and a plain page.
Each of the six pockets have room for tags measuring 4"x4½".
The half sheet of patterned paper is used to join these sets of pages together.
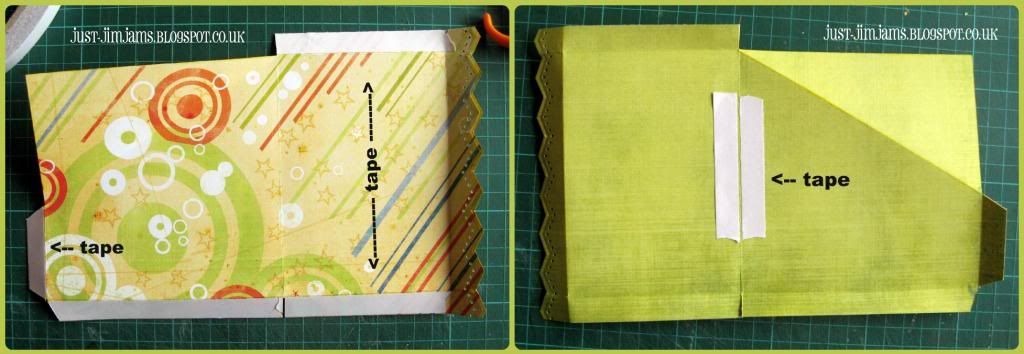
Punch a decorative border along one short edge. Trim the sheet so that it measures 6"x9¾". Score along both long edges of the sheet (½"). Score three times across the short width (½", 5½" and 9").
Trim away excess paper as shown on the photo. Cut in ½" from the bottom edge along the "central" (valley!) score line. Score a diagonal line across from the top centre to a point 3" down the un-punched edge. Crease all score lines as shown in the photo.
Apply adhesive to the ½" flaps as shown in the photo. Turn the sheet over and apply some adhesive either side of the central fold line to seal the rear of the pockets which will be formed in the next step.
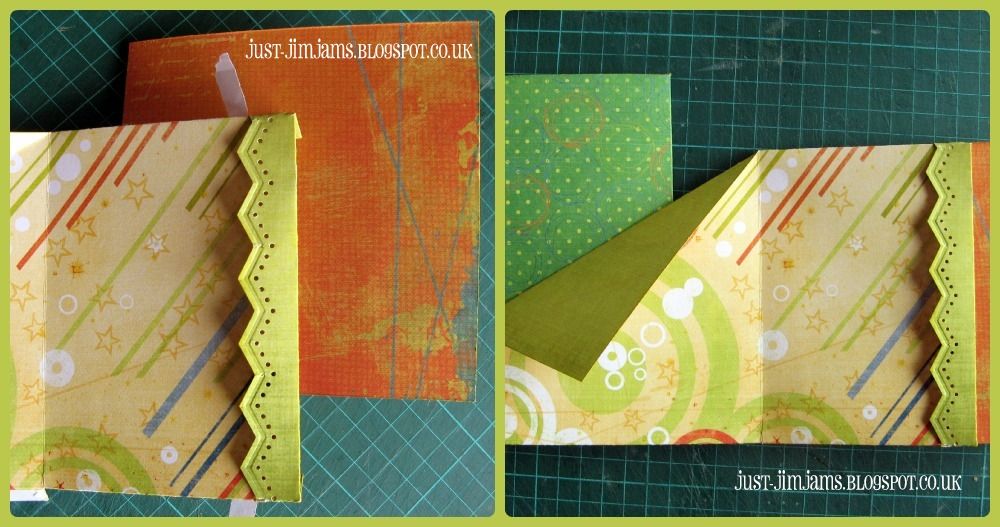
Fold back the punched border and adhere the right hand section to the back of the plain page of the rear set of pages. NB: You will need a little extra adhesive on the flaps where the border folds back (see photo below)!
Adhere the left-hand section to the back of the plain page of the front set of pages.
The two central pockets have room for tags measuring 4"x4". The inner pages are now complete:
Phew! Well done for sticking with me this far! Tomorrow I'll share the instructions for the cover.
ETA - the cover post is here!
In the meantime, please hop on over to Kathy to see what she has to share with you today (but remember to leave a comment, including your UKS name, before midnight tonight in order to be eligible for a prize from UKScrappers).




Justmlove those papers. Great travel journal.
ReplyDeleteFab tutorial, thanks for all the clear pictures they really help. Looking forward to the cover post. Do you mind if I pin this?
ReplyDeleteThanks for sharing your mini book tutorial.
Wizbit (Liz)
Gorgeous paper, and what fantastically clear instructions.
ReplyDeleteThanks for sharing,
Rinda
I've bookmarked this to read tonight after work. Looks like something I would like to try. thanks for sharing.
ReplyDeleteJust fab-u-lous! Thanks so much for showing us how to make your lovely book, Jemma.
ReplyDeleteSue x
Love this, thanks for sharing. Might take me a while to get my head around the folding bit though! xx
ReplyDeletepurplybunny (uks)
Brilliant tutorial and I love making books so I am bookmarking this one. Jen x
ReplyDeleteGreat tutorial Jemma, bookmarked for later :) x
ReplyDeleteWill be giving this a go for sure :-)
ReplyDeleteWhat a stunning project. I MUST bookmark this to try.
ReplyDeleteKim
Fantastically clear instructions :)
ReplyDeleteGreat instructions for the book. Looking forward to seeing the covers
ReplyDeleteUKS lelly
Fab Jemma! Im off on a scrappy weekend this coming weekend and those instructions are coming with me - thanks for sharing
ReplyDeleteI love mini books, this looks fun. Tigerlady
ReplyDeleteFab mini max! You have an excellent set of instructions here, very clear.Thanks for sharing.
ReplyDeleteGreat tutorial which makes a very complicated procedure easy to follow ... even I might make a decent attempt with these instructions. Thank you.
ReplyDeleteUKS new2this.
thank you so much for such detailed instructions..will be back for the cover ...
ReplyDeletescrappybluecat uks
I'm a big fan of mini books and this is lovely so I'll be having a go sometime soon.
ReplyDeleteThanks for sharing.
Fantastic Tutorial and lovely mini book.
ReplyDeletefrom Boland x
I love mini-books and this one looks so interesting plus easy to follow looking instructions so I am definitely going to try this - have pinned it - thank you so much for sharing
ReplyDeletePaulineD UKS xxx
Oh this is fab! I will be back tomorrow to see how the covers are made. Quite fancy having a go at this mini album :) Thanks for sharing.
ReplyDeletechrisrydal x
Lovely bookk look forward to the cover tommorrow.
ReplyDeleteMeg baby UKS
Love this. Have bookmarked this so I can print off the instructions. It will be great for a mini book I need to do. UKS sue1952
ReplyDeletefantastic mini book :)
ReplyDeleteLeigh11 xxx
fantastic book :-)
ReplyDelete*here be dragons*
that's beautiful
ReplyDeletethank you for sharing how you made it, I'll be back tomorrow to see the covers made.
Fabulous Gemma! Love the detail and how you've managed to incorporate so many photos with just a minimal amount of paper! I just love that paper range too - Sunkissed, isn't it?
ReplyDeleteAli x
What a lovely idea, am off to find some paper to have a go, many thanks!UKS - Sharon1973
ReplyDeleteFirst of all squeal as I have that orange paper and have always wanted to use it for something fab! I love this tutorial and can't wait for tomorrows cover tute! Thanks for sharing. Sian aka Violaceous :)
ReplyDeleteThanks Jemma I love the Mini version so I think I will definitely like to have a go at this one too
ReplyDeleteGreat Project JimJams! Will be looking out for 'part deux'!
ReplyDeleteLove mini books so I;ll definitely be doing this one. I;ll be back tomorrow to see how the covers are done. thank you for sharing
ReplyDeleteChris55- UKS
This makes into a super thing, and I adore that paper too (seems like there is a few of us) (Maria in France on UKS)
ReplyDeleteLove this. Can't wait for the cover instructions. Thanks for sharing :) (uks Jacqui200284)
ReplyDeleteThanks Jemma - fab little book. Almost forgot to comment, I got carried away looking further down on your blog - haven't read it for a while! Must come back soon! :)
ReplyDeleteUKS:AllycatD
This is lovely, will need to have a proper look later as I love mini books :) Kitty Crafts UKS
ReplyDeleteFab. Love the bright colours. Tanks for sharing.KJJC - uks name
ReplyDeleteThanks for sharing JJ, definitely one for my pin board. (UKS TinkerHamilton)
ReplyDeleteSuch a clever book - thanks for sharing the tutorial. UKS - Julesaroony
ReplyDeleteLooks great... I'm going to give this a go...
ReplyDeletewow your mini book looks great so adding it to Pinterest so I can come back and study it (who knows I might even make one!!) xxx
ReplyDeleteFab tut hun! Looks really nice, I shall definitely have to give it a go
ReplyDeleteHugs
K (aka Sylphraven)
Brilliant project, thanks!
ReplyDeleteUKS - Clairewill
Lovely book, have it on my to do list now :) UKS - Scrappyyo
ReplyDeletemy name is Sue and I am a mini book addict - this definitely feeds my addiction ! Will be having a go at this -Thanks
ReplyDeleteSoojay.
Oh we love mini books and yours is fab, thanks for the 'how to'.
ReplyDeleteGreat project but looks a bit mind-blowing at first glance will have to read it again and see if I can tackle one. Mary x
ReplyDeletescarymary555 on UKS
Great book & tutorial!
ReplyDeleteI love mini books and yours is fab! Will check back tomorrow to see your cover...Uks...Bubbleblitt
ReplyDeletelove minibooks thank you for sharing---alibi
ReplyDeleteThis looks great and very interesting - getting so many ideas from this blog hop so far and this one is a 'must male's for me. Thanks for the inspiration! Audrey uks name poetcrafty xxx
ReplyDeleteThanks for sharing
ReplyDeletethank you for sharing this, hyou've done a great job.
ReplyDeletecantstopstampin
Great book and fabulous instructions. Will try this. UKS Tagsie
ReplyDeleteGorgeous book, on my list to try! - Cassia
ReplyDeletewow, thanks for giving us such detailed instructions. I will have a go at this, but there's nO guarantee that mine will end up anything like yours, LOL.
ReplyDeleteNIKIG(uks)
Commenting again as i forgot to add my uks name this morning LOL
ReplyDeleteBeanpie11 aka Debbie R
Wow, what a fab project and such lovely clear instructions - TFS.
ReplyDeleteToni xx
(misteejay)
Beautiful...and thanks for the clear instructions, feeling very inspired now! Hugs Sarah (butterbee on UKS)
ReplyDeleteLove this and looking forward to seeing the second part. Thank you for the tutorial. Love, stillcrafting from UKS xx
ReplyDeleteBeautiful! Such a lot of work has gone into it!
ReplyDeleteLaura Godfrey
Lovely papers and a great looking book, will be back tomorrow for the covers tutorial :) JoPink
ReplyDeleteThanks for the clear instructions and sharing your mini book with us.
ReplyDeleteFran (Hedgie)
Fantastic tutorial joanne
ReplyDeleteI enjoy making mini books so another idea to add to the idea pile, thank you :)
ReplyDeleteLots of nice little pockets and flaps in there, a great gift.
ReplyDeleteSuperb instructions - I love this project :)
ReplyDeleteStacey Scrapred on UKS
Great project! That is a really clear tutorial. Pinned it and will share at my crop! great stuff! jenx uks wear crafts
ReplyDeleteA great mini book, thanks for sharing
ReplyDeleteBrilliantly clear instructions (with fabulous pictures with measurements) and I've already bookmarked and pinned it. Won't be long before I try this one, I'm sure. (Eileen C)
ReplyDeletethis is a great project!
ReplyDeleteuks - darm
Excellent Jimjams, loved the mini version so will have to have a go at this one
ReplyDeleteUKS name Fizzydrink
Great tutorial and mini book - ticks all boxes for me! Thanks for sharing and I look forward to seeing the cover next.
ReplyDeleteLovely clear instructions. Thanks
ReplyDeleteUKS meggie
Thanks for the tutorial, the photos help make it really clear. Must add it to my list of projects...
ReplyDeleteUKS - mumof4girls
Thanks for sharing, I will have to sit and digest the instructions and perhaps make a dummy version! UKS Jolene
ReplyDeleteMakes me wish I didn't have to go to work tomorrow so I could stay home and play!!
ReplyDeleteThis is fabulous - great photos and info - thanks. Have made note to come back for better look. Gill x UKS name is Seaside Crafter.
ReplyDeleteI love the photo-heaviness! Much easier to follow after a 12 hour night shift! LOL
ReplyDeleteBookmarked for later ref ! :)
UKS PinkSparklyScrapper
Catching up on some blog reading today - what a fantastic album! Thanks for the tutorial.
ReplyDeleteI have those papers, used them once but then they came in another kit. Still love 'em. I really like these clear instructions and am sooo impressed with the marked up photos and everything. Thank you - shall have to have a play :)
ReplyDeleteYou have put so much work into this lovely tutorial, Jemma - wonderfully clear and such a great result! I do love journals ...
ReplyDeleteWow, great project Jemma! I'd love to try one of these, but it would have to be on a day when I was feeling like geometry was my friend. Very cool.
ReplyDeleteFabulous! Such a good, clear set of instructions and a great result!
ReplyDeleteI hope you won't mind me posting a link to this, on my blog's "Tutorials, Makes, Ideas" page?
Awesome tutorial. Thank you so much for sharing t. I will have to give this one a try.
ReplyDelete