Showing posts with label JOSC. Show all posts

Monday, 20 February 2012

A Story Scrapped

Do you enjoy the Sunday Stories that you read here and via Siân's Blog?  I do - but one of my 2012 goals was to get more of my stories down on paper i.e. into my scrapbooks!  So here is a page from last August's Sunday Storytelling with the memories hidden away on those two pull-out tabs:


The flowers were in my Christmas embellishment swap - thanks Susanne! - and I was inspired to try colouring a doily by this page by Kirsty.  The tiny alpha stickers are by Adornit and come in a mix of colour combinations dominated by black, red and white.  Unfortunately the printing (on my sheet?) isn't quite true so some of the letters end up with a black or grey (or white) strip along one edge which is annoying once the stickers are off the sheet.  I guess that's the trouble with buying my supplies on-line - I have no idea if it's a one-off or a general problem with this range! 


My layout is based on my Just One Sketch sketch - rotated as per prompt 2 of the class - yes I am a little very behind as we just had prompt 11 yesterday!  It's also not square as the page is for my BOM which is 8½"x11" and I've changed the shape behind the photos to a circle and there's no border!  In fact, as usual, I have deviated quite a lot from the sketch - but then I always see sketches as a starting point rather than something to stick to rigidly!  Do you like sketches?  Are they recognisable by the time your page is done?

Wednesday, 8 February 2012

Tiddly-om-pom-pom

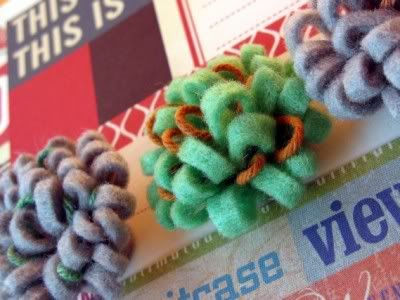
The Basic Grey Felt Pompoms in this month's kit-to-copy from Scrapbook Circle's Note To Self kit are beautiful but, not having any in my stash, I set out to find a way of counterfeiting them.

This tutorial from Sara at Craft Snob was the nearest I could find but wasn't that close to the BG original.  However with a couple of minor adaptations I have come up with what I think is a pretty close approximation for the pompoms in the kit.


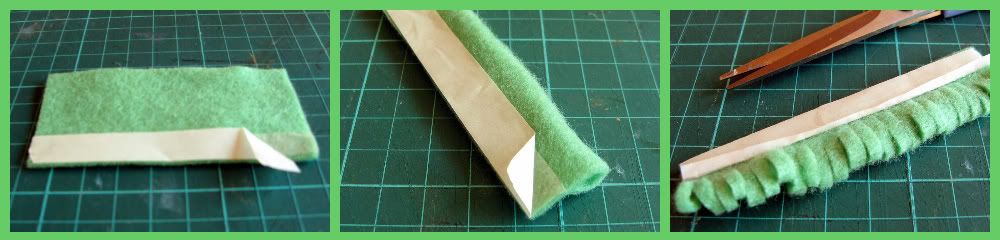
For a 1½" (38mm) wide pompom you need a strip of felt measuring 3½" (9cm) long by ... well that depends!!
{I'm too lazy to get out my glue gun or my needle and thread, so I used sticky tape!  Ideally it should be nice and thin (⅛"/3mm), but if you don't have any, you can use "standard" (½"/1cm) tape instead, though it is more wasteful of the felt!}
The width of your strip of felt needs to be twice the width of your roll of double-sided tape plus 1" (2.5cm).  So with a narrow tape (⅛") the strip measures 1¼" and with a wider one (½") it measures 2".

1. Stick the tape along one long edge of the felt.  Fold it in half lengthways so that the long edges meet and a tube of sorts is formed.  Stick another strip of tape along the long edge (but don't remove the backing paper yet).


2. Make lots of  ½" (13mm) cuts into the folded side of the strip (stopping at the edge of the tape) - these will form the loopy bits of the pompom.  Mine are about ⅛" (3mm) wide.

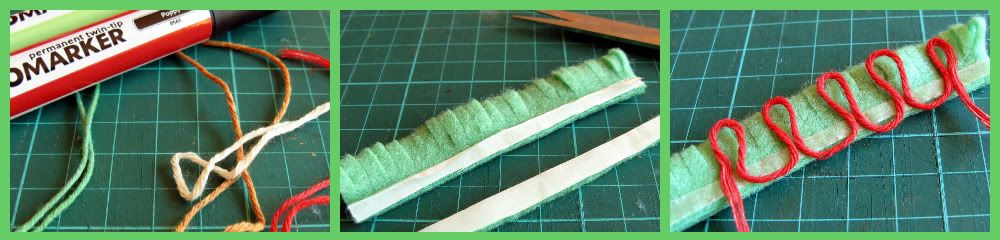
3. For the coloured string I used the spare string from a parcel tag and coloured it with one of Child No.3 's Promarkers.  Embroidery thread would work too ... or thin yarn ...  My parcel tag string was 10" (26cm) long.

4. If you've used wider tape you can now trim your felt strip along the taped edge so that the tape strip is about ⅛" (3mm) deep.  This will help to reduce the height of the finished pom pom.


5. Stick the coloured string to the exposed tape in loops about 1" (2.5cm) in from one end of the felt strip.

6. Roll the felt strip up tightly, starting at the end with most string stuck to it.

7. Using some fast-drying liquid glue (Superglue, Diamond Glaze, Glossy Accents) stick the whole shebang to a small scrap of card and you're done!

These are super-quick to make - I decided I needed a smaller pompom than my kit samples for a page I was making at my crop on Saturday and it took maybe 2 minutes to make one with a 2" (5cm) strip of felt (though I didn't add the contrasting threads).

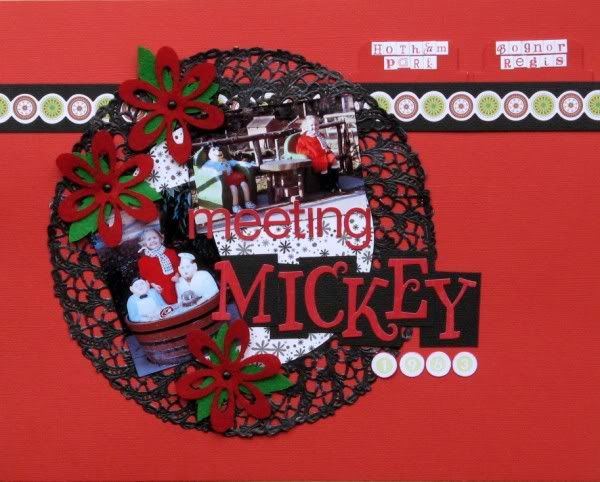
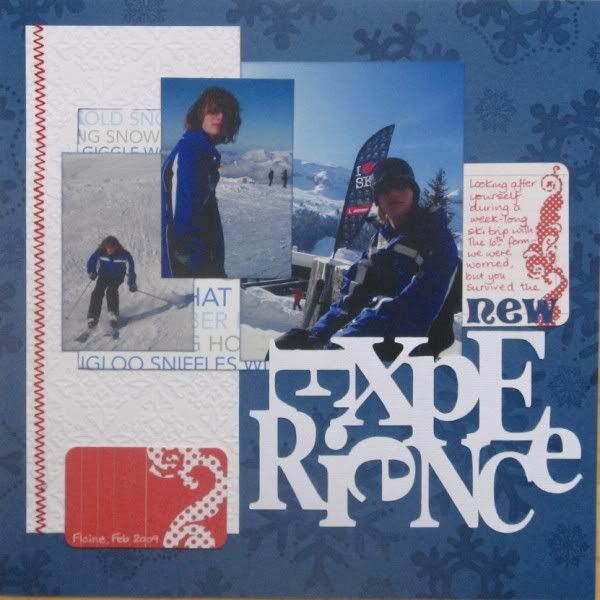
Some memories from my days as Girl Guide in the Swallow patrol
as told here.
Of course, I've used papers and card from my 
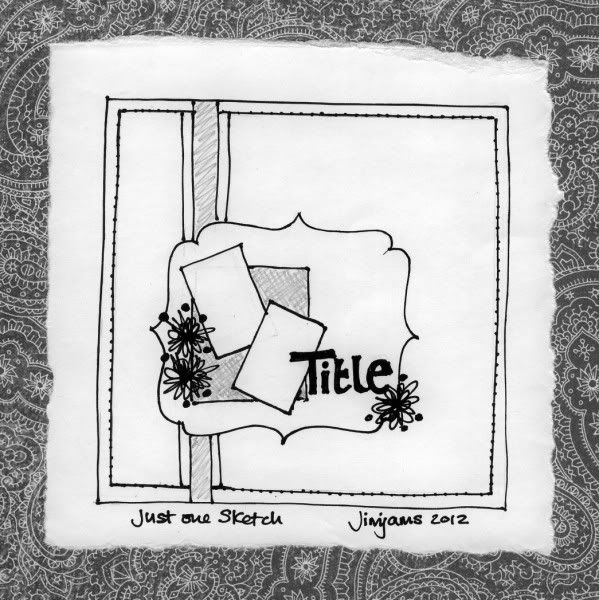
February Counterfeit Kit (with the addition of a MS deep lattice punch, a QK texture folder, Man Oh Man Sizzlit dies and some punched butterflies) and have based this on a vertically challenged version of my Just One Sketch sketch.  It also fits rather nicely with this week's UKScrappers' challenge and Julie Kirk's Month of Sunrays too :o)

Thursday, 26 January 2012

My One Sketch

Here's my sketch for Miss Smith's Just One Sketch Class.  Still way behind on the prompts thanks to the feed issues, but hopefully I can catch up a little this weekend.  I started fiddling about in Photoshop Elements before deciding that there was nothing wrong with good old pencil & paper (& marker pen & scanner LOL).


Thanks to some welcome extra feed-back about my "style" as seen on my example pages I've added a couple of extra points (thanks guys):
  • Layering and overlapping √
  • L shapes: either formed with the photos and papers or the photos themselves √
  • Curves: curved shapes or at the very least rounded corners √
  • Not a lot of visible journalling √
  • Big, bold title (Julie) √ 
  • Not wishy-washy or frou-frou (Helen) √
  • Framing (Siân) √

Tuesday, 24 January 2012

Just One Sketch Class

I signed up for Miss Smith's Just One Sketch Class as I am a sucker for a good cause - she's raising money for Girl Guides (in Armenia?) - and I love sketches.  However Blogger isn't playing ball, so I missed the beginning of the class and keep missing the prompts.  Luckily a few of my blogging friends are also taking part so when they post about the class I do get a reminder of sorts to get off my posterior and search for the prompts!!

First off we had to choose some favourite pages and analyse what features they had in common (click on them for a closer view if you're a glutton for punishment LOL):


I've purposely only looked at single 12x12 pages although I do like double paged layouts and also scrap some 8½x11 pages. It was hard enough choosing just these!

Well I see:
  • Layering and overlapping
  • L shapes: either formed with the photos and papers or the photos themselves
  • Curves: curved shapes or at the very least rounded corners
  • Uneven titles to squeeze large fonts into a small space or titles split over several lines with mixed fonts
  • Quite full pages
  • Not a lot of visible journalling 
  • Maximum 2 patterned papers
What other factors do you think these pages have in common?