Welcome to the Counterfeit Kit Challenge Blog's NSD Scene Of The Crime hop around the Master Forgers' crafty spaces. It started here with Sherrie and you should have reached me from Angela.
So here it is: my "official" scrapping space - one end of our family room in all its glory. I have a desk, a chair and some storage space along with a daylight lamp for evening crafting. I wonder just how many scrappers use IKEA Expedit furniture?!?!?
I say "official" because I often spread to the dining table as there's more space and I'm nearer to Hubby and we can chat while I scrap. The rolling tool box in the foreground is my crop box and a lot of my supplies live in there permanently so that I can grab and go! As you can see I did NOT tidy up before taking the photo ... too busy scrapping this page!
Now it's time to take a look at Jennifer's place. Hopefully a little more organised than me (especially as she hosted an Organisation Weekend not so long ago)!
Sunday, 5 May 2013
Wednesday, 1 May 2013
Counterfeiting May Seriously Damage Your Pile Of Scraps!
Welcome to another month of kit counterfeiting with the Counterfeit kit Challenge Blog. This month we are welcoming Sherrie as our guest designer to start off the counterfeiting and if you hopped here via Angela you will already know that the luscious kit-to-copy this month is Polly! Scraps March Kit Shoreline. Lots of primary colours mixed with white, some funky buttons, envelopes and trims ...Now, I haven't been making a huge dent in my kits recently as scrapping time has been diverted elsewhere, so this month I decide to base a lightweight kit around papers from my scraps bags alone.
Hmmm! Not one single complete sheet of patterned paper; just scraps of various sizes! Which makes it quite hard to type up a list of contents as most of the manufacturer's strips are long gone :-)
Yellows: MME Be Amazing, EP Adventurer, LBD Lemonade, Bazzill Swiss Dot Cardstock, EP Sunshine
Reds: Daisy D's red dot, Kaisercraft Silly Season, EP Rambunctious, Sandylion My Heart Beats For You
Blues: Portobello Road Polka Dot Blue, Kaisercraft Loire Valley
Blacks: Sandylion U Gimme Butterflies, DCWV Black & White Prints
Various trims from my stashSandylion Red & Yellow Disney Alphas
Mrs Grossman's Vellum Edge stickers
Various journalling spots including Jenni Bowlin shaped journalling spots
Hand-coloured home-made buttons (check the CKCB on May 8th for lots of counterfeiting tutorials).
Cardstock will be added from my stash as required. It will be interesting to see how far I can stretch the kit and whether the fact that the papers are already cut up will help or hinder creativity.
Now please hop over to Jennifer to see what she's put together from Polly! Scraps inspiration kit.
P.S. There's a call out for new Master Forgers over at the CKCB - if you love counterfeiting why not apply?! The deadline is May 30th!
Sunday, 28 April 2013
Passing The Page With JSquared #2
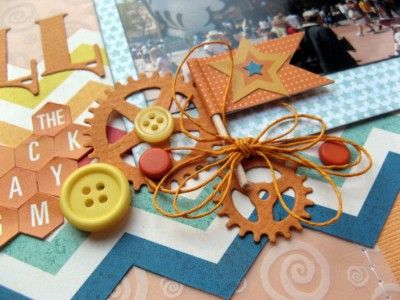
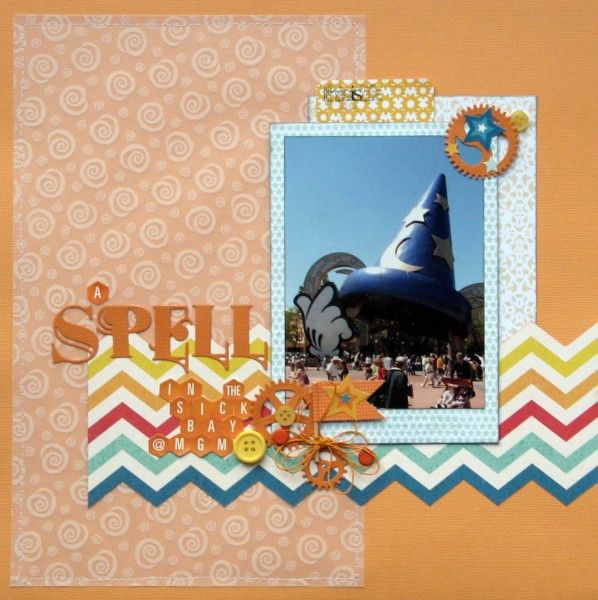
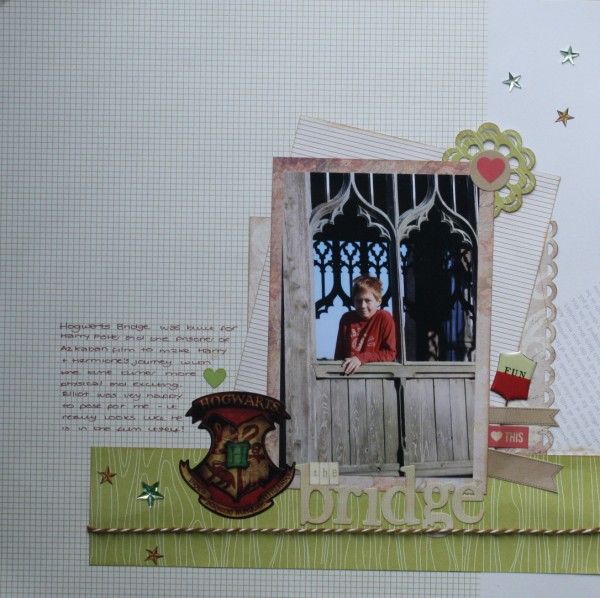
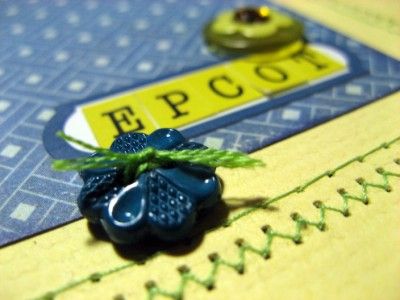
My lovely friend Julie (aka JSquared) is celebrating her 2nd Blogiversary today and is marking it with a Pass the Page. She collected a baker's dozen of us together to each scraplift a page in turn. The person before me in the chain was my very good friend Ruth (if she sent you here then you're on track, if not, you might like to start at the beginning with Julie here). Ruth is currently scrapping photos from her visit to the Harry Potter Studios so it seemed extra appropriate for me to use her page as inspiration for a photo of another magical place (as well a gears & cogs cut from her dies at our Bloggers' Retreat).Journalling on the "this is life" tag tells the story of how our early morning plans to ride the Tower of Terror resulted in Child No.3 feeling violently "unwell" at MGM Studios. Luckily, Disney have a great health centre and she was able to recover there for a couple of hours in a darkened room with me while the men-folk carried on enjoying the rides. By mid-day she had recovered and was adamant that the Ice Cream Social at Epcot was next on the agenda!! The back of the tag has photo-proof that a couple of hours sick bay sleep worked their magic and Child No.3 was back to "normal"!
Can you see the resemblance to Ruths's page? I kept the large single photo, corner embellishments and the horizontal strip. I replaced the subtle checked paper with vellum and switched the journalling for my title. All supplies are from my March Counterfeit Kit.
I wonder what elements were kept or discarded when Kirsty scraplifted my page? Before you pop over to see, you should know that there is a prize available on this Pass the Page hop, all you have to do is comment (here, there and everywhere)!
Wednesday, 24 April 2013
A Super-Quick Page
Welcome to the penultimate leg of the April Counterfeit Kit Challenge Blog Members' Blog Hop (or CKCBMBH for short)! Today we are sharing our takes on the photo inspiration challenge. I had a go at this earlier in the month ... but it wasn't hard to do another page with my April Counterfeit Kit as the colours of the kit match the inspiration photo pretty well!
I made 95% of this page at my last crop ... in about 30 minutes! Because I had taken about 5 hours to make a single page (too much chatting and faffing around), my neighbour challenged me to get another page done in the remaining time! A quick bit of machine sewing once I was home and it was done!
That is seriously fast for me. But then I find the (space for the) title is often a stumbling block, and I haven't bothered to use one with this page, so perhaps that's the secret to speed scrapping?!
Most of my pages have titles of some sort. Do you think layouts have to have a title?
The final stop on the hop is Glinda, but if you didn't reach me while hopping around the CKCBMBH from Jennifer you might like to nip over to the Counterfeit Kit Challenge Blog and see what everyone else has done for this challenge.
I made 95% of this page at my last crop ... in about 30 minutes! Because I had taken about 5 hours to make a single page (too much chatting and faffing around), my neighbour challenged me to get another page done in the remaining time! A quick bit of machine sewing once I was home and it was done!
That is seriously fast for me. But then I find the (space for the) title is often a stumbling block, and I haven't bothered to use one with this page, so perhaps that's the secret to speed scrapping?!
Most of my pages have titles of some sort. Do you think layouts have to have a title?
The final stop on the hop is Glinda, but if you didn't reach me while hopping around the CKCBMBH from Jennifer you might like to nip over to the Counterfeit Kit Challenge Blog and see what everyone else has done for this challenge.
Tuesday, 16 April 2013
Lean Mean MAXI-Books - The Instructions (The Cover)
Welcome back!
Yesterday I shared the instructions for making the inner pages of my Lean Mean MAXI-Book - which was quite enough photos and text for one day! I'm rested, you're rested and so today I have the instructions for the cover.
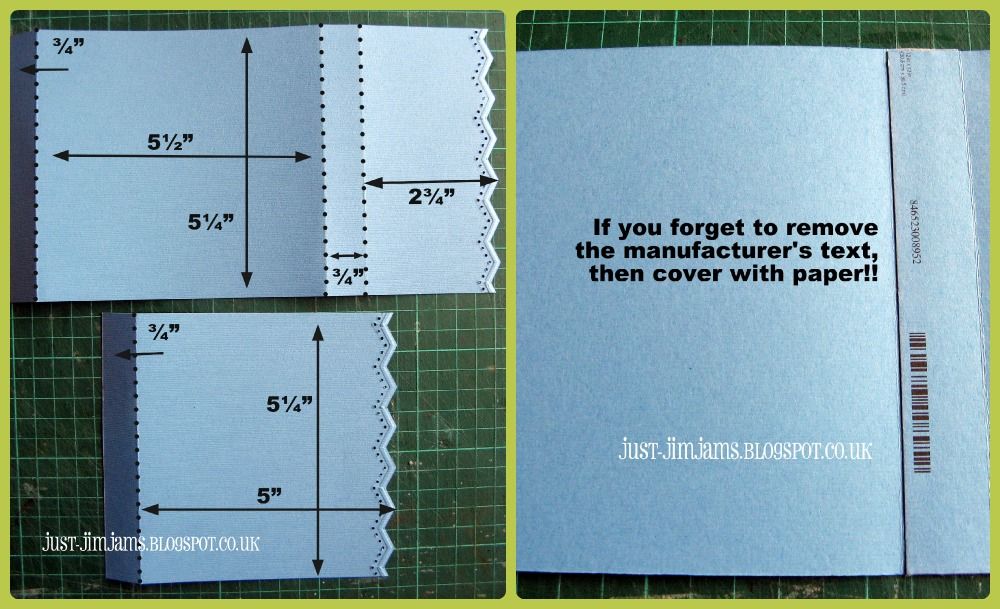
Cut two 5¼"x12" strips of cardstock. Punch a decorative border along one short edge of each rectangle and trim the strips so that they measure 5¼"x9¾" and 5¼"x6" respectively. Keep these trimmings for finishing the inside of the cover (see below).
Score three times across the width of the longer strip (¾", 6¼" and 7") and once across the width of the shorter strip (¾"). Crease all score lines as shown in the photo.
Apply adhesive to the inner side of the ¾" flap on shorter piece (the front cover) and join it to the outer side of the ¾" flap on larger piece (the back cover and closing flap) to form a 5¼"x14½" cover.
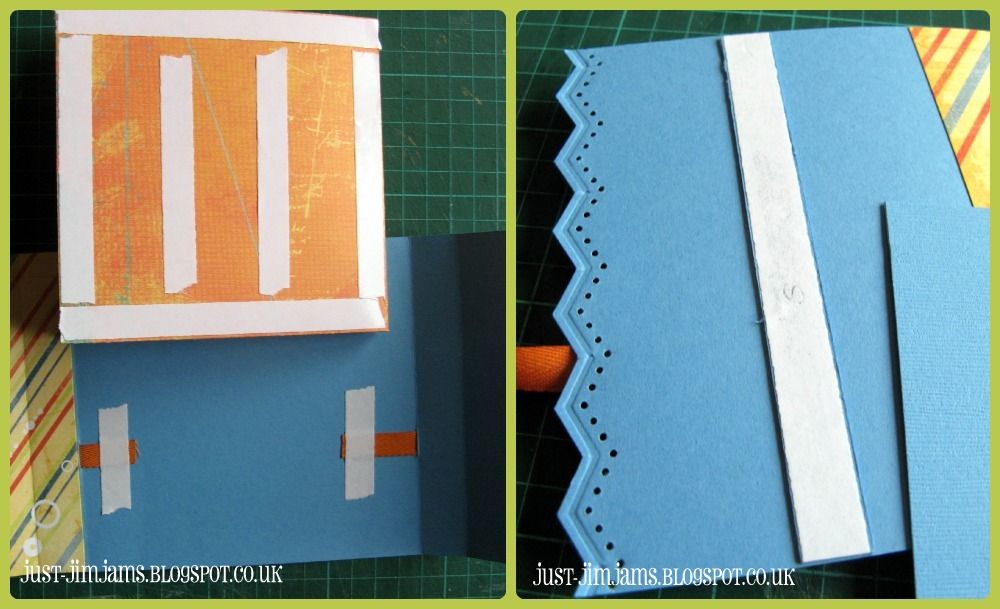
Make two slits for the ribbon closure about 2" up from the bottom edge on either side of the central section. Slot your ribbon pieces into place and secure with tape. You need 9-12" for the left-hand piece and 6-9" for the right-hand piece (if you have 20-26" you don't have to cut it in two). The shorter measurements are enough to tie a knot, the longer ones are enough for a bow.
Apply adhesive to the back of the inner pages and secure in place on the left of the central section of the cover, leaving room for tag-pulls on the right hand side. (Be careful to ensure the pages are the correct way up before you stick them down)
In order to stop the ribbon tie from squashing the inner pages I added a cardstock "stop" inside the front cover. It's two thin strips from the 5¼" offcuts, layered on top of each other 2¾" in from the punched edge of the front flap (see photo above).

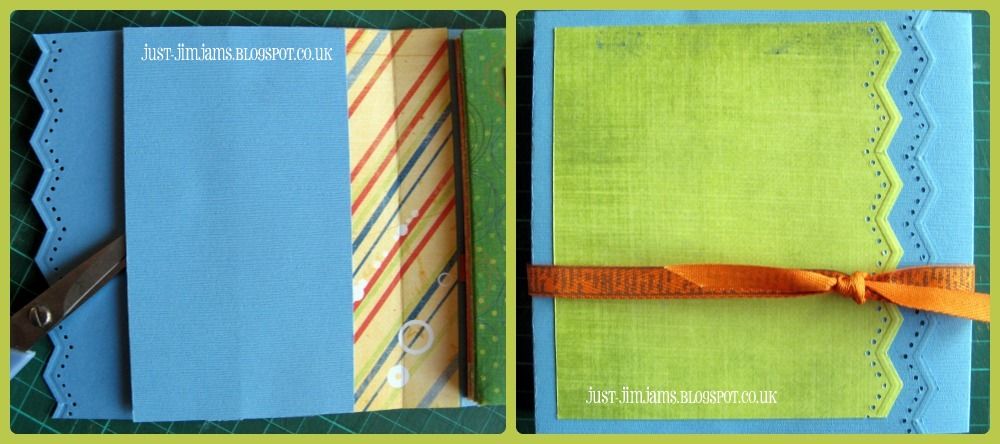
Cover with a 3"x5¼" rectangle of cardstock to form a slot (as shown above). When closing the cover, slip the right-hand flap inside the slot and the cover will remain in shape once the ribbon is tied.
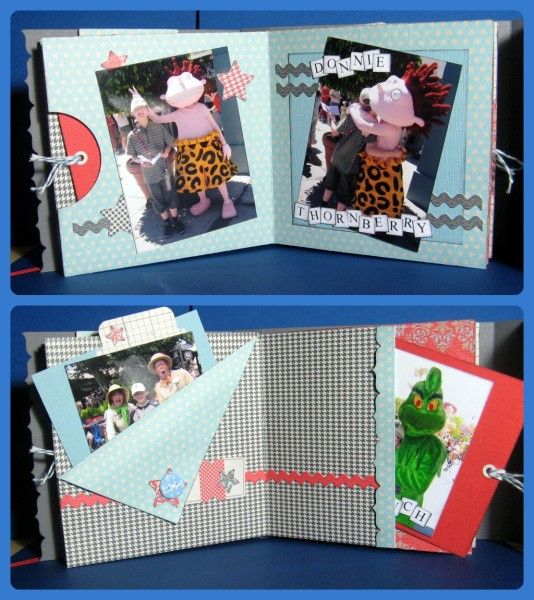
Add 4"x4" cardstock photo mats, photos, tag-ties, embellishments and journalling and you're done! I'm still working on mine, so here's a view inside one I completed earlier!
Thanks for sticking with me ... do please let me know if you have a go at my Lean Mean MAXI-Book (or even my original Lean Mean Mini-Book) as I'd love to see your version!
Yesterday I shared the instructions for making the inner pages of my Lean Mean MAXI-Book - which was quite enough photos and text for one day! I'm rested, you're rested and so today I have the instructions for the cover.
The Cover
Cut two 5¼"x12" strips of cardstock. Punch a decorative border along one short edge of each rectangle and trim the strips so that they measure 5¼"x9¾" and 5¼"x6" respectively. Keep these trimmings for finishing the inside of the cover (see below).
Score three times across the width of the longer strip (¾", 6¼" and 7") and once across the width of the shorter strip (¾"). Crease all score lines as shown in the photo.
Apply adhesive to the inner side of the ¾" flap on shorter piece (the front cover) and join it to the outer side of the ¾" flap on larger piece (the back cover and closing flap) to form a 5¼"x14½" cover.
Make two slits for the ribbon closure about 2" up from the bottom edge on either side of the central section. Slot your ribbon pieces into place and secure with tape. You need 9-12" for the left-hand piece and 6-9" for the right-hand piece (if you have 20-26" you don't have to cut it in two). The shorter measurements are enough to tie a knot, the longer ones are enough for a bow.
Apply adhesive to the back of the inner pages and secure in place on the left of the central section of the cover, leaving room for tag-pulls on the right hand side. (Be careful to ensure the pages are the correct way up before you stick them down)
In order to stop the ribbon tie from squashing the inner pages I added a cardstock "stop" inside the front cover. It's two thin strips from the 5¼" offcuts, layered on top of each other 2¾" in from the punched edge of the front flap (see photo above).

Cover with a 3"x5¼" rectangle of cardstock to form a slot (as shown above). When closing the cover, slip the right-hand flap inside the slot and the cover will remain in shape once the ribbon is tied.
Add 4"x4" cardstock photo mats, photos, tag-ties, embellishments and journalling and you're done! I'm still working on mine, so here's a view inside one I completed earlier!
Thanks for sticking with me ... do please let me know if you have a go at my Lean Mean MAXI-Book (or even my original Lean Mean Mini-Book) as I'd love to see your version!
Monday, 15 April 2013
Lean Mean MAXI-Books - The Instructions (The Inner Pages)
Welcome!
If you are hopping along with UKScrappers you should have reached me from Ifa, but the hop started here if you have no idea what I'm talking about (there are prizes available for commenting along the way by midnight BST tonight)!Last year I decided to make a MAXI version of my Lean Mean Mini-Book with the Mystery Kit from UKScrappers Now We Are Ten Cybercrop.
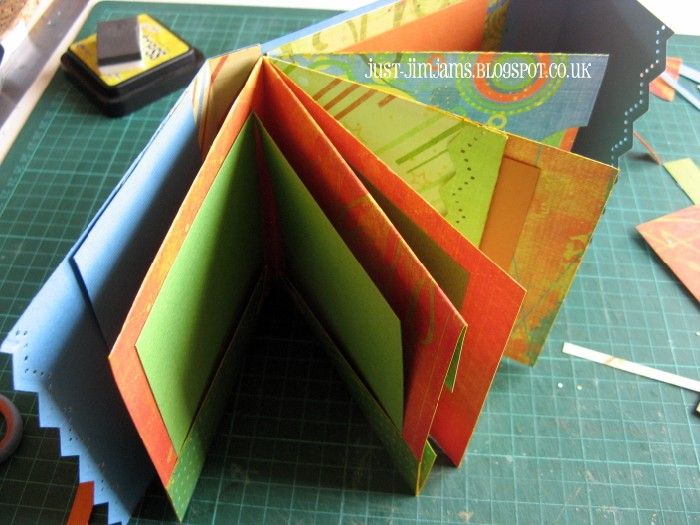
Using just 2½ sheets of decent quality double-side paper and 3 sheets of cardstock, it's an eleven page, 5" square mini-book with room for 21 3"x4" photos! I blogged the pages of the book here and today I am sharing the instructions for the inner pages. It's a photo heavy post, but hopefully all will be clearer that way!
The Inner Pages
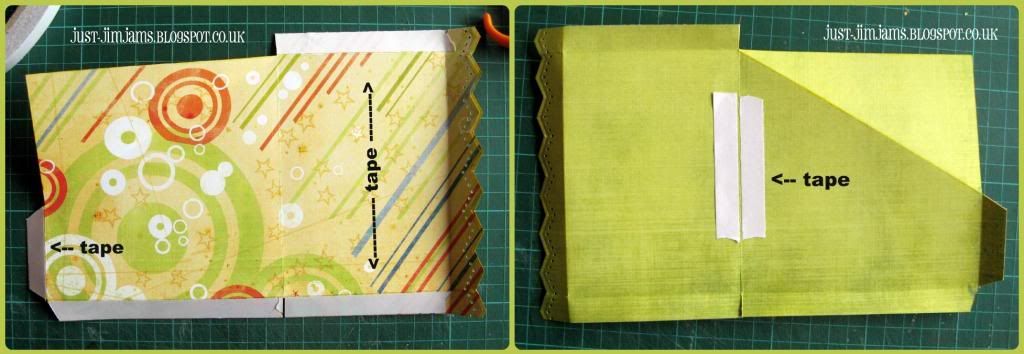
Trim 2" from one edge of two of the patterned papers and cut the remaining sheet into a 6"x12" rectangle (I used Fancy Pants About A Boy Peace, Vivid and Wild Child).
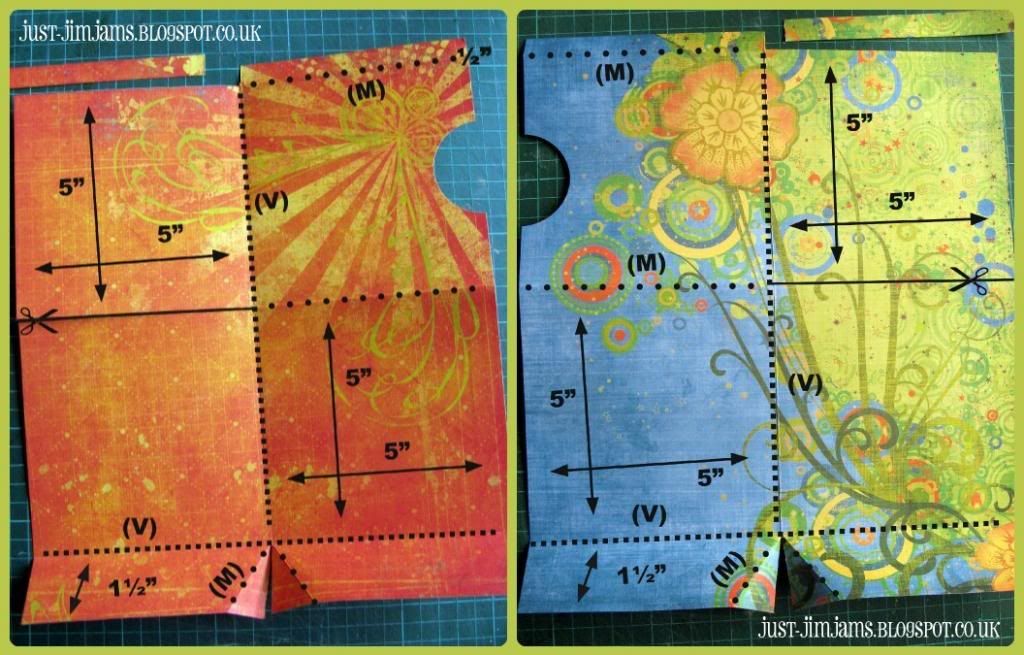
Score the two sheets of 10"x12" paper along the long centre line (5") and score three times across the width (½", 5½" and 10½"). These two sheets form the front and rear sections of the mini-book and are cut as mirror images of each other.
Remove a ½"x5" rectangle from one end of each sheet by cutting along the first width-ways score line to the central score line. Cut a semi-circle from the edge which is still intact to provide a pull-out space for a tag. Cut 5" along the middle width-ways score line on the opposite side to the semi-circle. Cut 1½" along the central score line to the third score line and fold back the corners as shown in the photo. Crease all score lines as shown in the photo.
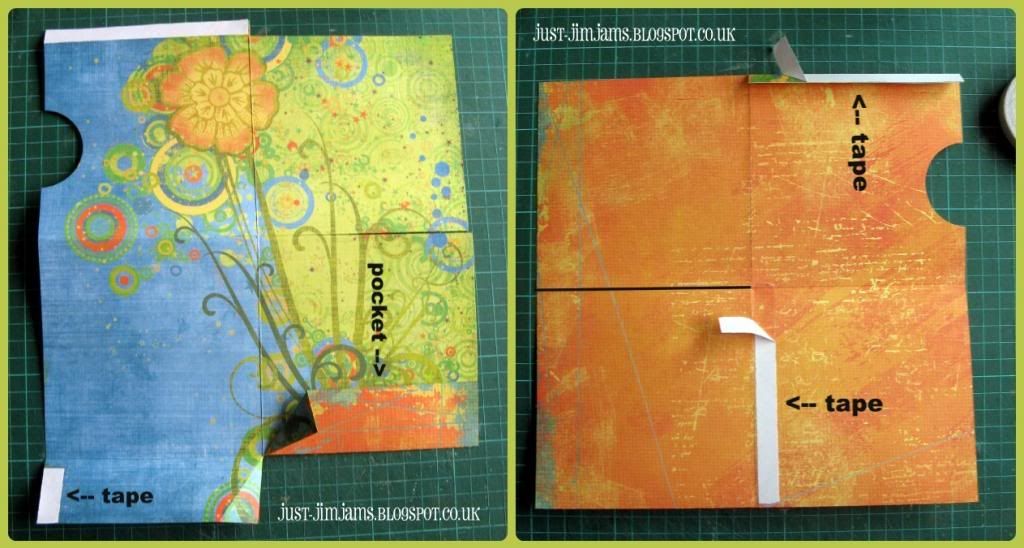
Apply adhesive (I've used double-sided tape) along the small flap at the top of the sheet. Apply adhesive to the outer edges of the bottom flaps and fold upwards to create pockets. Turn the sheet over and apply tape to the same side of the central score line as the top flap & punched semi-circle. Fold the sheet in half (from top to bottom) to form a concealed pocket with a semi-circular cut-out.
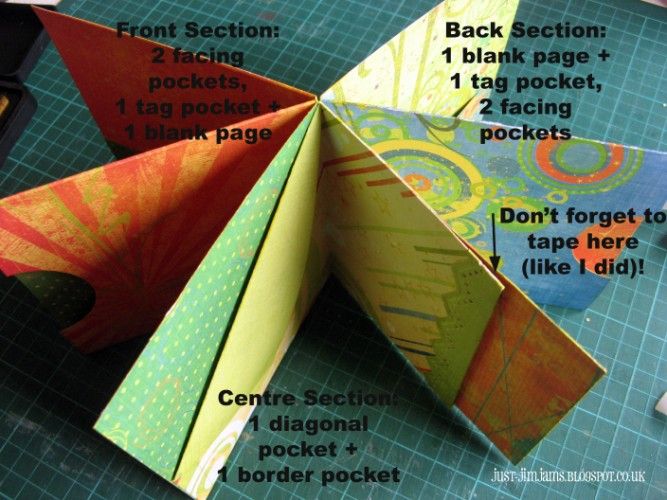
This completes one set of pages for the mini-book (the back pages of mine): containing a plain page, a pocket page with semi-circular cut-out and a double page with facing pockets.
Repeat with the other scored & cut sheet (remembering that you are working on the mirror image) to form another set of pages: a double page with facing pockets, a pocket page with a semi-circular cut-out and a plain page.
Each of the six pockets have room for tags measuring 4"x4½".
The half sheet of patterned paper is used to join these sets of pages together.
Punch a decorative border along one short edge. Trim the sheet so that it measures 6"x9¾". Score along both long edges of the sheet (½"). Score three times across the short width (½", 5½" and 9").
Trim away excess paper as shown on the photo. Cut in ½" from the bottom edge along the "central" (valley!) score line. Score a diagonal line across from the top centre to a point 3" down the un-punched edge. Crease all score lines as shown in the photo.
Apply adhesive to the ½" flaps as shown in the photo. Turn the sheet over and apply some adhesive either side of the central fold line to seal the rear of the pockets which will be formed in the next step.
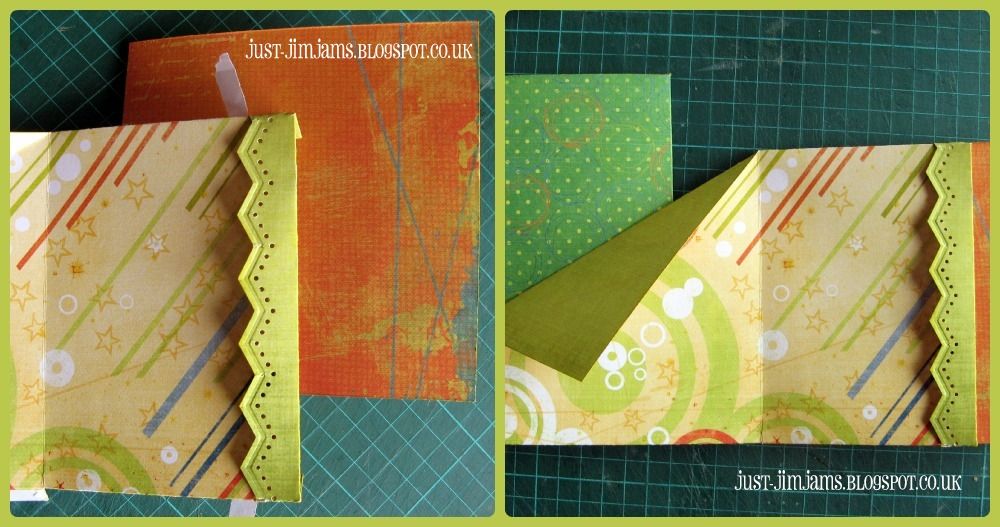
Fold back the punched border and adhere the right hand section to the back of the plain page of the rear set of pages. NB: You will need a little extra adhesive on the flaps where the border folds back (see photo below)!
Adhere the left-hand section to the back of the plain page of the front set of pages.
The two central pockets have room for tags measuring 4"x4". The inner pages are now complete:
Phew! Well done for sticking with me this far! Tomorrow I'll share the instructions for the cover.
ETA - the cover post is here!
In the meantime, please hop on over to Kathy to see what she has to share with you today (but remember to leave a comment, including your UKS name, before midnight tonight in order to be eligible for a prize from UKScrappers).
Labels:
Blog Hop,
Instructions,
Mini Books,
UKS
Friday, 12 April 2013
Who me?!
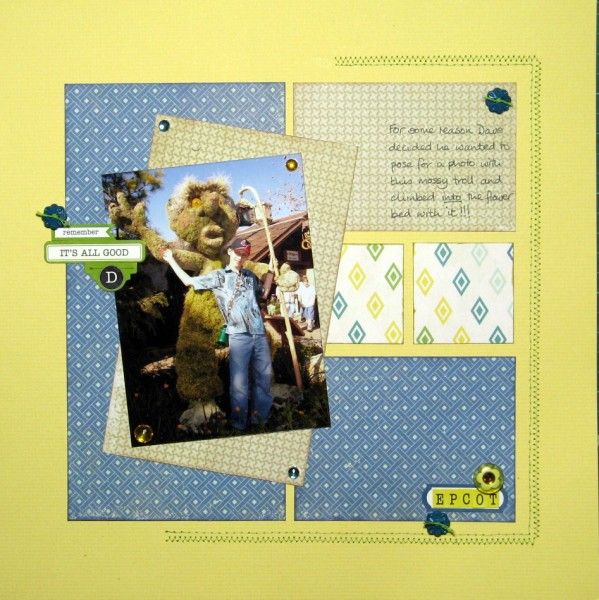
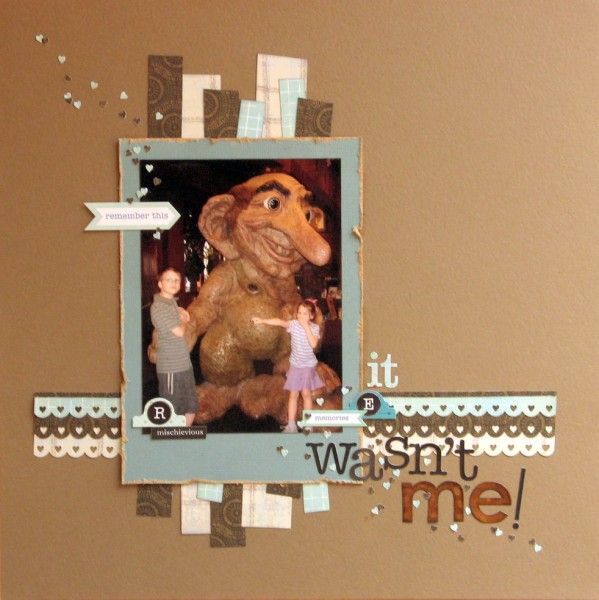
The Norwegian section in Disney's Epcot is full of trolls, one of whom was used by No.2 Son and Child No.3 as a backdrop. Typically on this holiday, these two were pulling funny faces and giving the photo with the cave troll an extra imaginary story!
I thought it was all about smells and bottom burps ...
but having finished the page at last weekend's crop, Child No.3 informed me that she thinks she was sniggering because her brother had been "caught" by the troll! No.2 Son says it was too long ago to remember! I reckon our different versions need recording somewhere on there, so I'll be adding some extra journalling!
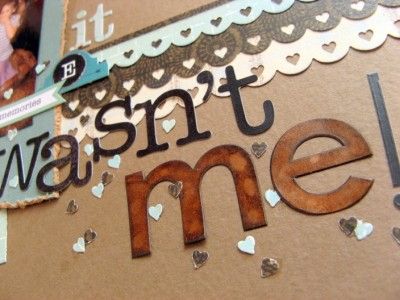
I've used the April sketch from Purple Pumpkin to do the second challenge from the CKCB: use nothing but stickers to embellish your page. Supplies are from my April Counterfeit Kit along with some extra alpha stickers (the tiny alphas from my kit were too vibrant) and my Mum's new American Crafts Knock-out border punch. Those punched out hearts were too cute to throw away, but were soooo time-consuming to stick onto the page!
I thought it was all about smells and bottom burps ...
but having finished the page at last weekend's crop, Child No.3 informed me that she thinks she was sniggering because her brother had been "caught" by the troll! No.2 Son says it was too long ago to remember! I reckon our different versions need recording somewhere on there, so I'll be adding some extra journalling!
I've used the April sketch from Purple Pumpkin to do the second challenge from the CKCB: use nothing but stickers to embellish your page. Supplies are from my April Counterfeit Kit along with some extra alpha stickers (the tiny alphas from my kit were too vibrant) and my Mum's new American Crafts Knock-out border punch. Those punched out hearts were too cute to throw away, but were soooo time-consuming to stick onto the page!
Labels:
CKCB,
Layouts,
Purple Pumpkin
Subscribe to:
Posts (Atom)


.jpg)