Thursday 23 December 2010

Jam packed!

Photo - Traffic jam due to snow
Well it didn't take me a whole week to get back from North Wales ... it just felt like it!  The journey normally takes a couple of hours at most ... but thanks to the snow, a jack-knifed lorry and some steep hills it actually took me six hours to get there, although only three of them were spent with the engine running!   I had my camera with me, but there aren't that many ways to photograph dozens of stationary vehicles and by the time we got moving again it was a) dark and b) I was desperate to collect No. 2 Son and return home before we got caught in more snowy jams!


In the meantime here are a few more pages for my JYC album: Wrapping paper first of all ... I buy new every year, and add it to the rolls of sale wrap I bought in January, which combined with the left-over wrap from previous years mean I probably never have to buy any again ... ever!

JYC 2010 - Dec 10th - Jimjams
JYC 2010 - Dec 11th - Jimjams

Now there's a decent sized Christmas tree ... it's been a few years since we saw it for real though!  Check it out (in English) here.

Child No. 3 decided she wasn't fussed about what we put up on the tree today, possibly because there were no brothers around to fight with about decorating rights!

JYC 2010 - Dec 12th - Jimjams
JYC 2010 - Dec 14th - Jimjams

Finally,  I have used the inside of one of the envelopes that my pages are built on - for the programme from tonight's concert.  No photo though as I forgot to take the camera - tsk, tsk what kind of scrapper am I? Just as well that we couldn't actually see my daughter playing thanks to the church layout or I really would have been miffed!

Friday 17 December 2010

Gggrrrrr and Bbbrrrrrrr

I seem to have had another fail ... with the links in a PDF I sent to UKS ... so if you've come here looking for my Christmas Word Book photos ... you need to go here!

The snow has returned and I have to drive to NW Wales ... I may be some time!

Wednesday 15 December 2010

Five Day Fail!

Well despite my best efforts at keeping up with my JYC pages I am well behind, not only in creating the pages, but in sharing them on the blog and forum.  These were completed one day earlier this week and the principle of KISS pages is working well; it's just finding the crafting time that is not!

JYC 2010 - Dec 5th - Jimjams

Day 5 was on topic, but for the 6th, rather than contrast two aspects of Christmas, I used the page to contrast with the previous one and think about Advent Calendars when I was small.

JYC 2010 - Dec 6th - Jimjams
JYC 2010 - Dec 7th - Jimjams

Vaguely back on prompt for the next two days with Day 7, documenting my geeky way of organising the family Christmas fund (well with £961, donated by 10 couples, to spend between 34 individuals, I need all the organisational tools I can get!)  Day 8's sight of the season is a photo across a local field - that's not snow - it's frost - possibly rime, or hoar, or a combination!

JYC 2010 - Dec 8th - Jimjams
JYC 2010 - Dec 9th - Jimjams

Finally Day 9's subject is the increasingly "traditional" Christmas Market which seems to be creeping across from the continent.  We visited these a lot when we lived in Holland and they are gaining in popularity over here now.

I may be failing to keep up; I may be failing to share my pages regularly; I am, however, having a great time creating quick and simple pages :o)

Monday 13 December 2010

Just say "No!"

I love the weekly challenges that are set over on UKScrappers ... a mix of sketches, embellishment, themes, sizes ... they are set by "teams" and individuals who produce a few example pages to get people started and you never quite know what you might be asked to include on a page!  I don't always manage to join in, but would miss them if they disappeared.  A shout went out recently for a last-minute volunteer to set a challenge because a gap in the schedule had come to light. "How hard can it be?" I thought, and put my virtual hand up.

My husband is always moaning at my inability to say "No" because I end up with too many things to do and too tight a deadline ... and so it was with this little project too.   I'd forgotten that I was doing "Journal Your Christmas" and was already 2 months in arrears with "Project 12" ... and that's without mentioning the Christmas shopping, our daughter's birthday and the broken boiler - brrrr!!!!

Anyway a promise is a promise, and I couldn't renege on the deal ... so I composed the challenge, but, rather than doing the three examples that I wanted to do, I only managed one, and that wasn't complete until very late last night either! Phew!


At least the warm colours and sunny photos made up for me scrapping next to a fan heater, wearing three jumpers and a scarf and still being too cold to talk without teeth chattering!

Now if I want to keep my husband happier, I really must practise saying "No", "Non", "Nein", "Nee", "Na", "Nej", "Nem", "Nie" ... and maybe then I'll get the presents bought and wrapped!

Wednesday 8 December 2010

Advent Origami

I have been folding paper over at The Studio as part of their Advent Projects.  I took a simple little Origami folding technique and after making hanging decorations and a garland I worked out that these shapes would be perfect to construct a Christmas tree

Origami Xmas Tree - Jimjams

If you fancy having a go, pop over there to download a step by step guide.
ETA 28/11/11 - I've also shared the method directly in a blog post over at It's A Creative World here.

Saturday 4 December 2010

Recipe for a Perfect Christmas

We're having a Christmas Cybercrop over on UKS this weekend and one of last night's challenges was perfect for today's JYC prompt :o)

JYC 2010 - Dec 4th - Recipe For A Perfect Xmas - Jimjams

No ingredient list as we tend to make it up as we go along, but I'd recommend:

Select one tall tree, a sprinkle of bright lights, & a few baubles.  Wrap with tinsel until festive & set aside in a corner until Twelfth Night.
Peel envelopes from cards, extract good wishes & mull over news.  Pour heart out in round-robins placed into postbox.
Take several flurries of snow & roll into balls.  Toss in the air or stack in the garden.  Add coal, carrots, scarves & pipes as desired.
Mince pies with a letter for Santa.  Marinade with port by chimney overnight.  Stuff one stocking per person.
Pull crackers, inserting heads into paper hats, & split sides at enclosed jokes.  Coat turkey & trimmings with mouth, chewing well.  Repeat several times until full.  Lubricate with tipples until vision blurs, then snooze. 
Divide gifts into piles & cut away wrappings.  If desired, add thanks, otherwise arrange face suitably before returning to shop. 
Mix well-loved cartoons with TV specials, add family games & continue until tempers fray.  Apply hugs to smooth over.
Blend Christmas spirits in with visitors, filling days with goodwill.  Light an open fire & toast until done.  Serve everything under mistletoe, sprinkled liberally with good cheer.
Suggested accompaniments: close family & fine friends
Font is Type Ra which includes £ signs ... why do font creators leave us out but include the $ sign :o( Stamps are Basic Grey's Flurries, paper is from a Papermania Christmas pack and the date spots were created in MS Word with Kingthings Willow.

Friday 3 December 2010

Keeping It Simple Sometimes


Mini-book - JYC 2009 - Jimjams
In the year 1PB (Pre-Blog) I was lucky enough to win a place on Shimelle's "Journal Your Christmas" course and made a mini-album documenting Christmases past and present, our December traditions and activities, the weather as well as New Years Resolutions and the start of 2010.  Thirty seven pages (December 1st - January 6th) plus a couple of extras, bound into a fat little album which will be fun to look back on.  The pages are here if you're curious. 
Unfortunately I had such fun creating each page, that I couldn't keep up and it took me the whole of January to finish the album which began to be a bit of a chore.  There were two ways to improve upon that this year:
  1. Do LOTS of preparation before December: make a month's worth of blank pages, journalling spots, date spots, etc and just add the photos and journalling on a daily basis.
  2. Keep it really, really simple: just a photo a day, some journalling and the date.
Well the first plan fell by the wayside, not helped by my Egyptian adventures, so I guess it will have to be a really simple, easy to keep up with album.

Mini-book - JYC 2010 - Jimjams
"Manifesto" page plus buttons in the snow
My pages are based on C5 manilla envelopes from the stationers - this will allow me to have a pocket for extra journalling when I need it without adding extra layers.  I had considered cutting the envelopes into squares, but have decided that I like the landscape format of them, so that's one less chore to worry about.

My thanks to Mary for her recent gift of bright green buttons used here :o)
JYC 2010 - Dec 2nd - Jimjams
Seagulls at Winterley Pool
I was also agonising about covering up the flaps/seams on the back of the envelopes and then remembered  that life is just too short to worry about things like that.

Keep It Simple, Stupid!

To give the pages continuity I have picked out some Basic Grey flourish stamps, printed off my own date spots using Kingthings Willow and am typing up the journalling with Type Ra font.

JYC 2010 - Dec 3rd - Jimjams
And that's me up to date at just past midnight on the 3rd day ... how long will I keep things simple I wonder?

Wednesday 1 December 2010

Season's Greetings

Back in 2008 a fellow UKSer, Danyaz, generously shared how to make your own chipboard word books and I just had to have a go:

Mini-book - Noel - Jimjams

Mini-book - Noel - Jimjams
It was made for a friend celebrating Christmas with her first grandchild and contained room for her to put her own photos and journalling, using lots of bright Doodlebug paper, foam snowflakes, seasonal ribbons and stickers - pretty much whatever Christmas stash I'd accumulated over the years.

As I'd given that one away, I thought I'd do another one using up some spare papers from a HOTP Paper Pizazz Christmas book.  I've done a step by step guide too which I've sent to UKScrappers to share with you.

Mini-book - Noel - JimjamsMini-book - Noel - Jimjams
I'm intending to add some festive photos and seasonal quotes and make this into a special Christmas greeting for my Mum - better than a card I hope!
Mini-book - Noel - Jimjams
I added an extra page here to help disguise the fact that I messed up the orientation of the patterned paper - I was so busy including the swirly bits along the bottom of the pages that I didn't spot that the diamonds pointed in different directions!
Mini-book - Noel - Jimjams
There are plenty of pockets and tags and even a couple of extra pages to fill and I think I'll leave the back page empty for a photo from this year.

Saturday 27 November 2010

All time favourites

A scrappy friend of mine, Natalie (NJMax over on UKS) is just launching a challenge blog at the moment and has a blog hop this weekend ... why not check it out over at Punky Scraps.  I shall be having a look around this evening once I've watched "Harry Hill's TV Burp", which is one of our favourite family shows on a Saturday evening.
 
Part of the requirements of Nat's blog hop is to link to your all time favourite layout ... now there's a conundrum!

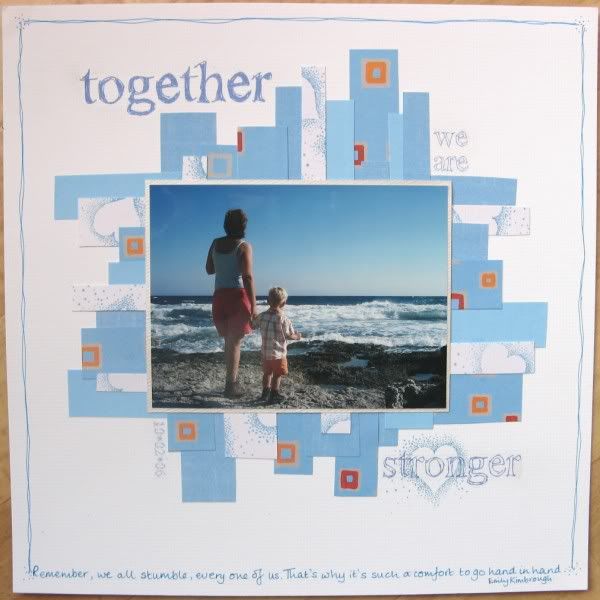
Remember, we all stumble, every one of us.
That's why it's such a comfort to go hand in hand.
Emily Kimbrough
My first instinct was to choose a page that had been popular over on UKS because I do get a sense of affirmation when LOTS of other people also like my current favourite page.  In which case I would have picked this one, made in 2007 for my Dutch friend who actually introduced me to scrapbooking.

It was inspired by a page called "Laugh" by JoolsG who seems to have moved over to digi-scrapping these days.

I loved my page because it was simple and clean, it used my friend's beautiful photo, it had a quote that was perfect and the title was also apposite!  On top of all of that I had great fun making the title rub-ons myself using the !Sketchy Times font and special Crafty Computer Paper.

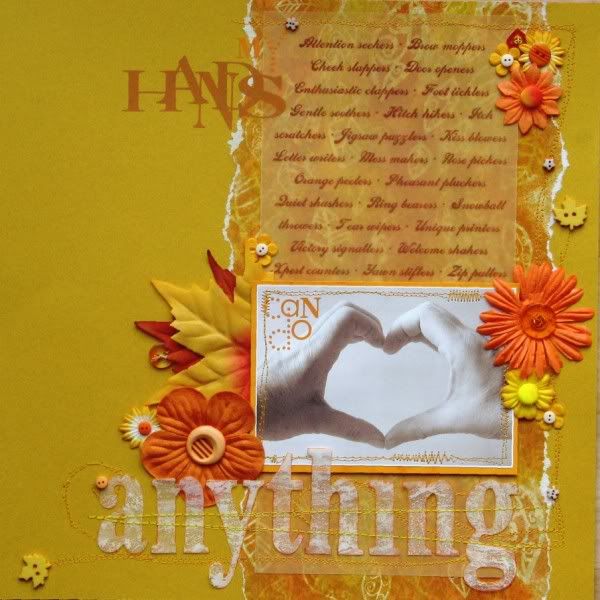
On the other hand, I wanted to choose a layout that I still owned, one that was my own design and contained more of me!  

In which case, it would probably have to be this one from 2009, which was made for a challenge over at Indigo Mill (I miss their shop).

I had fun thinking of an A-Z of what my hands can do; I took the photo of my hands myself, having mastered the self-timer; I included lots of sewing on the page and best of all, I managed to use up some un-loved peel-offs to transform some truly awful shiny paper into an interesting background.

Looking at that page got me thinking about another page I did for an Indigo Mill Challenge - this one telling a story about my mobile phone battles with my kids.

The challenge had been to make a page without any adhesive at all.  I had a lot of fun with staples, sewing, brads, grommlets, clips and even punches to affix the various elements to the page.

However the main reason that I love this page from 2008  is the journalling - it takes the form of a monologue addressed to my middle child who, like the others, had to wait until he was 16 before being able to have his own mobile phone.  It lists the reasons why the kids wanted phones, and the reasons why I didn't want them to ... a piece of our family history!

Now, back to the conundrum I started with: my all time favourite layout.
On the one hand, I like the page about my hands. On the other hand I like the page about our mobile phone battles. But which one is best? According to Harry Hill, there's only one way to find out.  
FIGHT!

Wednesday 24 November 2010

I'm back!

Did you miss me?  "Who?" I hear you ask, "Where are you back from?"
I've just had a brilliant, unexpected and very last minute break by the Red Sea - that's one way to replenish and revitalise my stock of photos to scrap.  Here are a few to be going on with while I wait for the prints to arrive ...
... and also for my friends to share their underwater photos - whoever knew there were so many different kinds of fish?!

Wednesday 10 November 2010

Work In Progress

I won't be able to blog for a couple of weeks so I thought I'd share some sneaky peeks of what I've been working on ... watch this space!

Sneaky Peek - origami decorations - Jimjams

Sneaky Peek - Xmas word book - Jimjams
(The cat is now out of the bag here)
Sneaky Peek - Origami Xmas tree - Jimjams
(Pop here to find out what this turned into!)

Saturday 6 November 2010

Scoubi Doings

Whilst queueing at the bar at a concert recently I nudged my friend and gestured towards a girl standing nearby.  Said friend is a fellow scrapbooker and understood immediately ... we'd spotted a crafty item that perhaps we could recreate!  Using existing stash.  Without costing a fortune. Creating something unique and personal.

And so this week I decided I'd have a go at making a similar bracelet to the girl in the bar - a bracelet made from buttons.  Only I didn't have the right sort of buttons.  Not enough four-holed, equally sized, tonally pleasing coloured buttons. Well I did have enough buttons for one bracelet, but it was immediately snaffled by Child No. 3 - "Buttons are IN right now" she informed me!


So what to do for a bracelet for me?
I have lots of chipboard, I have loads of scraps of patterned paper, I have a 1" circle punch and I have a Silent Setter which punches tiny holes, so I set to work once again.


Of course paper-based jewellery won't last forever, despite a couple of layers of PVA glue, but then these are so cheap and fun to make that I'll make more when they wear out while I'm looking for decent real buttons!

My prototype bracelet used wool to string the buttons together, which works fine; I'm sure thin ribbon would also work well enough.  Of course there are proper jewellery making supplies of waxed cotton thread or leather thongs that are meant to be used for these things, but, again, I didn't have those.  Instead I have used some scoubis - remember them?  Scoubi heyday was back in 2006 and it seemed like the whole world was busy weaving and knotting and plaiting ... the children (teenage boys included!) and I made necklaces, animals, bracelets, key fobs, coasters, ... "Buy more please Mum", "I've run out of pink!", "Rachel's asked me to make her a green sparkly bracelet" ... and then suddenly, almost overnight, they lost interest, leaving hundreds (possibly thousands) of the things rotting in a bag at the back of the cupboard.  Except that they aren't rotting - they're plastic and will sit there forever, waiting, abandoned ... :o(


Anyway - three scoubis have now been put out of their misery and pressed into service ... just 1397 to go!

Friday 5 November 2010

Yuletide is looming ...

I love Christmas - the decorations, the lights, the mince pies, the mounting sense of excitement, the darkening nights, the stollen, the window displays, the carols sung by church choirs, the royal icing on top of marzipan on top of alcoholic fruit cake, the stockings hanging by the fireplace, the mulled wine - I love it all!  But only in DECEMEBER!

During November I despair that other people make me feel under-prepared because I haven't even made a Christmas shopping list, let alone tackled it; I shut my ears to the claims by friends that all their hand-made Christmas cards have been stamped and addressed and are ready to be posted (last year I received the first Christmas card in October!?!?!?); I turn away from stacks of seasonal goodies in the supermarket - those mince pies will be out of date before we're half-way through Advent, let alone be in a fit state to leave out for Santa!

I haven't always been like this.  One year I did manage to make about 100 Christmas cards for all our various friends and relatives and they were delivered on time!  The secret to this was finding a simple design that allowed for a bit of creativity, wasn't too boring to make over and over and over and over .... and wasn't a ridiculous price to send (Royal Mail's Pricing in Proportion has had an unfortunate effect on the hand-made card production in this house!).

Christmas Cards - Shrink plastic - Jimjams
These cards were made with triangles of shrink plastic, which were doodled with OHP pens before shrinking, wrapped in coloured wire, dotted with toning glitter glue, mounted on doodled silver card with a sequin and the whole shebang was matted on a couple of rectangles of shimmery paper.  When I got bored with drawing lines I switched to wrapping wire and when that palled I dotted glitter glue ... it was fun and the kids could help too.

Nowadays, however, I am down to making just a handful of cards, which get hand-delivered to my nearest and dearest.  This does mean that I can make more of an effort; my Mum's favourite was a Christmas Tree card which folded flat for the envelope but functioned as an ornament as well as a seasonal greeting.
Spiral greeting on Christmas tree card - Jimjams
It isn't my design though - I found it in the UKS gallery and contacted its creator Irene Tan (Scapperlicious) for the instructions (which are based on Sandi Genovese's original design).  Irene has kindly given me permission to share the trunk and spiral templates and her original card is here so please give her some comment lurve if you have a go at making the card too.
Christmas tree card ready to post - Jimjams
Flat for posting!
Awful flash photos sorry - taken before I actually learnt to use my camera!
Now, I wonder what I'll do for this year's couple of cards ...

Wednesday 27 October 2010

Herr Kürbis

A seasonal post from me today with thanks to Child No. 3 and her German teacher who taught her, in German, how to make an Origami Pumpkin ... and we thought we'd share with you!  My German is a bit rusty so I've taken photos and will do the writing bit in English :o)

First fold a square of paper right sides together in half and press the crease line.  Then fold it in half in the other direction so that it is divided into 4 smaller squares.  Turn the paper over and fold it in half across both diagonals - to give mountain folds on the diagonals and valley folds across the sides as shown.
Then "squash" the paper together to form a triangle - this probably has some official name in Origami, but my daughter didn't know it! The next step is to fold  the two side points up towards the centre and crease the fold lines sharply.  Turn over and repeat to form a square as shown.

Now fold both side points towards the centre line and crease the fold lines.  Turn over and repeat to form a lozenge shape.  The next part was trickier to photograph, but is simple enough to do:  there are loose flaps at the top and side pockets formed by the folding ... slot each loose flap as far as it will go inside the pocket. 
Repeat for each of the four loose flaps and press flat.  Fold the visible sides of the pumpkin together to reveal a nice flat surface and draw a face - keep it within the centre of the lozenge shape so that it stays in the round part of the pumpkin.  Finally find the hole at one end of the lozenge shape .... and BLOW!  The pumpkin will magically inflate and you're ready for the next one!
Herr Kürbis, Frau Kürbis und ihr kleines Baby Kürbis
When drawing the face you have a choice of  having the blow-hole at the top or the bottom - if it's at the top the pumpkin sits a bit flatter on the surface (but needs propping up for a photo at this angle, like the "baby" in the photo); a blow-hole at the bottom means it can roll around a bit more, but looks better on the top.  I leave that up to you!

Saturday 23 October 2010

The Cat's Whiskers

I love sewing on my pages as I think it gives an extra textural dimension to them.  In fact the sewing machine is permanently loaded with a bobbin of clear thread so that I can quickly load up a top spool in the colour of my choice and get stitching.  I tried doodling stitches once as the machine was temporarily tidied away and vowed never again!  It took an age to achieve the effect I wanted and was a pain to try and keep the "stitch" lengths even!

As regular (are there any?) readers of this blog will know I recently attended the 5th Pink Booby Charity Crop in aid of Breast Cancer Research and I did a lovely class on distressing by Cathy Windsor from Sarah's Cards DT.  I bought the kit and produced a page that I love with photos from 2007.

There were loads of scraps left from the 3 sheets of double sided October Afternoon Thrift Shop papers so I thought I would see what else I could do with them rather than let them get buried in my scraps bags (yes that is plural!).

There were some large scraps for strips and lots of little bits which would do for a collaged paper element too ...

I was also inspired by a post about paper appliqué over on Siân's blog and thought I would try a bit of hand sewing on a page element!  Alas! I have yet again come to the conclusion that I prefer my machine for sewing.  Of course it didn't help that I was sewing through layers of card collaged with scraps of thick quality paper scraps.  Nor did it help that I'd decided to add zig-zag and blanket stitch rather than just sewing a simple straight line!
My fingers were aching by the end and I know it will be a while before I attempt anything by hand again!


My page started life as a Pencil Lines Sketch (#146)


It was much easier to machine sew the larger scraps of paper to my page and lots of fun to try out a few of the different stitch styles.  Using red stitches throughout helps unify the diverse shapes and colours on the page.  I used the free font Type-Ra for my journalling to tie in with the words from the One-of-a-Kind wordy paper.  I like this font better than Adler and other typewriter fonts because it includes more punctuation marks, including, for us Brits, the £ sign!
And I still have enough scraps from the kit to make something else.

The weekly challenges over on UKS are fun ways to motivate me, so there is a misted masked background (again using a home-made spritz from dilute ink), a symbol representing something from the photograph (my UKS team name is "The Scrappy Cats"), numbers on the page (not that difficult to do, but I included it in my title to show willing), and ribbon - the cat's whiskers :o)