Sunday 30 September 2012

A Stitch-Up?

Were you inspired by Clair's Stitching On Paper class last month?  I was.  Hand-stitching has featured on a few of my pages recently, including this page for my Las Vegas album.

Layout - Camel Racing - Jimjams
Meeting the UKS Weekly Challenge criteria of:
1 Photo, 2 Embellishments, 3 Cardstock colours, 4 Patterned Papers, 5 Title Words and 6 Circles

I've embroidered both my title, using the same font as on this page, and some hexagons directly onto the background cardstock.  I had fun with my border punch to make my banner and used some of my counterfeited flag tags for my journalling.  All supplies are from my September Counterfeit Kit.

Circus Circus is a "family friendly" hotel in Vegas with lots of free entertainment and floors full of fairground "attractions" ALL making the most incredible noise!  They probably ought to give out free headache tablets!

Most of the machines and games are very anti-social solitary, but five of us risked a few dollars throwing balls into holes in order to propel camels along a race-track - we still didn't win though - a kid just out of shot somehow beat us all. What a stitch-up!

Friday 28 September 2012

Positively Negative

There's been a bit of a trend recently for using negative space on pages - backing holes made by the Slice or Craft Robo or Silhouette with patterned paper as way of adding depth to a page.  I have been looking on enviously as I don't own any machines (or even punches) capable of cutting out the middle of pages like that.  I was therefore a little perplexed when the Counterfeit Kit Challenge Blog announced their third challenge for September: to use the negative space from punches or die cuts.


OK, I don't have a fancy machine but I do have plenty of punches so I got busy with some stars and circles to go with a photo of a Michaels store in Las Vegas that was the highlight of our stash shopping {and the starting reason for organising a trip to the U.S.A.}

Layout - Store Attraction - Michaels in Las Vegas - Jimjams

Thanks to Clair's recent Stitching On Paper class I'm still exploring hand-stitching and had fun with a great technique I learned from Kinsey Wilson's blog which I used to make faux negative space letters for my title.  I've used one of my favourite free fonts, Teen, which matches my teeny tiny Banana Frog stamps and my diminishing supply of Scenic Route chipboard alphas .


Challenge combining as ever, I've used the August sketch from Scrapfriends as part of a September Weekly Challenge on UKS. All Almost all supplies are from my September Counterfeit Kit, including home-made tags, but not including the lovely stripy chevron washi tape - that was kindly sent to me by Alison - thank you :o)

Wednesday 26 September 2012

CHA Fakery #3

This post is my third step by step for the CHA items I counterfeited for my September Counterfeit Kit - this time those cute bow-topped paperclips from Studio Calico.  If you check here on the Counterfeit Challenge Blog there is a way to make them with paper, but I chose to f make them with ribbon.

1. You need three lengths of ribbon: approximately 3", 2" with pretty notches cut at each end and 1" or enough to wrap around 3 layers of ribbon.  My rather shabby looking mat is marked out in centimetres for my more modern & European readers!  I've used a velvet ribbon so that the front and back of the ribbon is hopefully easily distinguishable :o)

2. Fold both ends of the first and longest piece to the centre and sew in place - I've used black thread for clarity but it won't show anyway.

3. Add the second notched piece "face" down onto the looped ribbon and sew in place.

Collage - How to add a ribbon bow to a paperclip - Jimjams
Collage made with Picmonkey - my new favourite on-line application!
4. Sew one end of the third and shortest piece to the centre of your bow; wrap it around the front of the bow to cover the stitching and sew the other end down securely.

5. Slot a paperclip through the loop made by the final piece of ribbon and use to embellish your project.
Photo - Home-made bow-topped paperclips

A quick question for you: when you add a paperclip to your pages which bit do you leave showing - the long or the short part? Or do you attach it so that the whole paperclip shows?  I actually like all the paperclip to show but then it isn't clipping!

Friday 21 September 2012

Summer's Over

Photo - felt trim and stone
Four leafed clovers
and a
heart shaped stone
That's it!  It's over!  No more hunting for a border/musician/bride/pier/library/angel :o(
The end of Summer has arrived and with it, the deadline for Rinda's Summer Scavenger Hunt. I managed to finish off my hunt on Wednesday and Rinda is hosting the Closing Ceremony on her blog today.  Just in case any of my 21 items are deemed inadmissible (the Border {Collie} perhaps, or the fact that my Horse was made of stone) I thought it politic to snap the two substitute items ... and give Mel a run for her money in over-achieving ...

If you want to see my 21 items up close and personal just click here, but in the meantime here is collage around my favourite photo - a butterfly shadow taken with my trusty point and shoot camera!  I usually use Picasa for making collages, but today I had a lot of fun trying out Picmonkey.

Photo Collage - all 21 items for the Summer Scavenger Hunt 2012
THANK YOU Rinda - it's been a blast!

If you want to see what other people found during the summer (or the winter for the antipodean hunters) then check out who else is signing out at Gallo Organico today.

Wednesday 19 September 2012

Scavenger Hunt Local Round-up

OK time is ticking and I'll have to go with what I've got.  No more hunting for a more exciting or exotic or funnier interpretation of an item in Rinda's Summer Scavenger Hunt.  No more hoping for a sunnier day to get a better photo (especially as our Indian Summer has finally migrated).  Here's my final round-up.

Photo - South American Pan-pipers
#7 - A Person Playing a Musical Instrument
Quite exotic I guess, but I did feel sorry for the man on the right who had to wear the pink outfit and seemed to be doing most of the playing.  You'd think that if you were carrying most of the tunes, rather than shaking the nuts or selling the CDs that you'd get to pick which colour to wear.  On the other hand, maybe he did!

Photo - Butterfly shadow
#11 - A Shadow
Early in the summer I spotted that a solar powered fluttery butterfly in my Mum's garden made this lovely shadow.  Not easy to photograph though as I had to wait for a sunny enough day for a decent shadow, then get Mum to hold her hand over the solar panel to stop the butterfly from fluttering and hope that the wind wouldn't start blowing.  This attempt belonged to my fourth visit after a) no camera, b) no sun and c) too much wind.

I have lurked outside churches, registry offices and even contemplated attending wedding fairs to get the next item.  In the end I diverted past a cake shop ...

Photo - Chatwins alternative wedding cake
#16 - A Bride
... to get Bride on her wedding night!   Do you think anyone would actually buy this cake for their big day?

Funnily enough, having bagged that bride, I spent last Saturday at Nantwich Food & Drink Festival where I managed to spot a real life bride being slightly overwhelmed by the crowds surrounding the town centre church.  I did take a photo but I won't add to her woes by posting it - they already had to abandon their plans for a horse and carriage due to the festival crowds {No - I didn't ask!  But I do know the man that had to break the news to her}

The food & drink festival was full of roadside stalls selling ... food & drink, including this most excellent ice-cream stall - a beautifully decorated converted VW camper van

Photo - VW Camper Ice-cream Van
 #4 - Roadside stall selling something
That left one thing to get ... irritatingly something that I'd seen early on and thought "No - I 'll wait for a better example of a movie poster than that!"  Ha - served me right as I haven't spotted any posters for weeks!  Today I had to divert to the cinema on the way home from the shops to capture not one, but four of the blighters!

Photo - Odeon movie posters
#18 - Movie PosterS
So that's me up to date ... apart from #21 ... which is compulsory apparently ... a photo of me standing with something symbolising my nation:

Photo - Me & My National "Symbol"
#21 - My & My National Symbol
Erm, not quite standing, whoops ;o)

Monday 17 September 2012

CHA Fakery #2

I was being cheerfully optimistic when I named my previous counterfeiting tutorial CHA Fakery #1, hoping that I'd find time to blog some further how-tos for the items that I counterfeited for my September Counterfeit Kit but not entirely sure that life would let me.  So far this month, the scrapping gods have smiled upon me and so here's a very quick and simple tutorial to share - forging the lovely flag tags made by Jenni Bowlin Studio:

Home made Kraft flag tags
  • Cut a rectangle from (kraft) cardstock, punch a hole in the centre of one end and snip out a triangle from the other end
  • Punch a hole in a scrap of (kraft) cardstock and then use a small (¾") circle punch to fake a ring-reinforcer {Tip: turn the circle punch upside down to help centralise the small hole}
    or use a small coin as a template if you don't have such a tiny punch and punch the centre hole afterwards
    or just grab a ring-reinforcer from your stationary supplies!
  • Colour it with inks/pens if required and adhere to your rectangle over the punched hole
Easy, peasy, lemon squeezy, eh?!  Which means that you can then start playing around:
    Decorated home-made kraft tags
  • use patterned paper instead of cardstock for your ring-reinforcer
  • use a different shaped punch for the hole
  • use a pen to add a border around your tag
  • add some stamping to a plain tag
  • add some patterned paper or washi-tape at the hole end of the tag
  • round some corners
  • layer up a tag onto patterned paper
And all for free :o)

Saturday 15 September 2012

Neglected Supplies Challenge


Layout detail - heat embossed chipboard title
I think we all go through phases of loving a tool or a technique, overusing it and then abandoning it.  Some of us also get carried away when shopping for supplies, adding "must-haves" to their baskets and then realising that they were actually "could-have-managed-withouts"!  I, myself, am particularly guilty of buying stash simply because it's a "bargain" without really considering where, when or how I'll use it.

That's why the first challenge this month at the Counterfeit Kit Challenge Blog is so great: dig out some un-loved supplies or tools and give them an airing.

My corner rounder is one of my Top Ten Tools, and certainly not one I would want to manage without, even though it hasn't had an airing for ages. So I gave it a bit of a work-out on this page with ancient photos from 2004. The background cardstock didn't come from my September Counterfeit Kit - it came from a "bargain" grab-bag of mixed green Bazzill - and was, I thought, almost unusably bright!  Luckily it toned with the peppermint greens in my kit's patterned papers and there were plenty of photos to help cover it up.

Layout - Snap Saboteur - Jimjams
This page also fitted in with one of the September Weekly Challenges over at UKScrappers
Heat embossing chipboard alphas is a sadly neglected technique for me; it's quicker, easier and a lot less messy to grab a sticker sheet or even die-cut some alphas.  However,  I love the effect and it's a great way to bring unity to a title formed from various different alphabet sets.  Therefore it was no great hardship to dig out my heat gun, silver foil covered chopping board, Versamark Ink and PSE Woven Tapestry embossing powder and set to work.

Child No.3 remembered the day the photos were taken, hotly protesting that there was no intentional sabotage, just high spirits!
What she does remember is running full pelt into a tree branch and grazing her forehead.
"Look, I still have the scar!" she said.
I looked; perhaps I need new glasses?
Wait!  Yes I can see it: the graze and lumpy forehead are visible in the one photo where she was prepared to smile at the camera!
Am I mean to call that Karma?! ;o)

Thursday 13 September 2012

6x6 Love

A recent series of posts (1 2 3) over at S J Crafts by Lisa-Jane inspired me to include some 6x6 papers in my September Counterfeit Kit.  The smaller patterns are more my style and strangely enough I found it much easier to to cut into a pristine sheet from a 6x6 pad - perhaps that's because it was already "scrap" sized or perhaps it was the thought of there being at least one "spare" back on the pad?!  Either way, they really helped me when I was creating this page about the sillier shopping opportunities in Las Vegas!

Layout - Fooling Around in Vegas - Jimjams
6x6 papers from MME's Lime Twist Fly A Kite pad
Layout detail - punched circles & computer-printed journallingWe kept seeing ridiculously large bauble necklaces for sale at various stalls on the strip and my friend decided to try one on.  Of course this meant that the stall holder thought we wanted to buy it and kept trying to find the price that we would pay ... eventually we managed to convince him that he'd have had to pay us to take it off his hands!!   We never did see anyone actually wearing one for real!
We were also tickled by the mega-super-sized packaging for certain products in the store nearest to our hotel.  I don't think they always colour-coordinated so well as these Cheese Balls though!

Everything is from my current kit apart from the title alphas and the orange scraps - they came from my August Counterfeit Kit! This page was also made for the Monthly Challenge over at UKScrappers - on the theme of Work, Rest or Play!

Monday 10 September 2012

Ten on the Tenth: Warwick Weekend

I was hoping that another weekend away would get me a few more things crossed off my list for Rinda's Scavenger Hunt and Warwick did not disappoint!

First off there was Warwick Castle itself.

Photo - Warwick Castle
 #6 - Historical Landmark
The beautiful Peacock Gardens within the grounds had something else I was looking for:

Photo - Fountain in the Peacock Garden, Warwick Castle
 #9 - A Fountain
While we tried to take decent photos of the very tame peacocks strutting about the garden we noticed that two photographers were taking lots and lots and lots of photos of a romantic couple ... "A real life bride!!!" I thought, even though she was dressed in a rather un-typical turquoise evening dress ...

Photo - engaged couple
... but it turned out that she was actually a Bride-to-be and they were doing a pre-shoot in advance of November's wedding {Yes, I did ask!!}  We kept seeing them around the grounds in several different ensembles and poses and eventually spotted them twirling for the cameras:

Photo - Dancing Couple
 #15 - Someone Dancing
That photo was taken from high above the happy couple because we'd climbed up and up and up the mound where the original castle was constructed using several of these:

Photo - Outdoor staircase
#19 - Outdoor Staircase
We also climbed the tallest tower of the castle to enjoy the views and we spotted something unusual in the distance ...
Photo - View from Warwick Castle

Could it be?  Once we returned home I studied Google maps and did my research  to confirm that this was indeed Gurdwara Sahib which is a Royal Leamington Spa's enormous Sikh temple.

Photo - Gurdwara Sahib from Warwick Castle
# 17 - A Temple {and that's a Church spire on the left!}
Warwick is pretty compact and I counted six churches on our wanderings - it seemed like there was one on every corner - so I did have a backup if the white pavilion had turned out to be the spa at Leamington or a themed amusement park!

Inside the castle there were several interesting exhibitions with a great cast of wax, animatronic and real live figures.  We learned how to rip people's tongues out with red-hot implements, admired the destructive powers of various arrow heads, gasped at the cost of a military horse (think Porsche in today's prices), and learned all about the Duchess of Devonshire's famous entertaining, some of which took place here:

Photo - Library at Warwick Castle
#8 - A Library
There were lots of activities laid on for families as it was the last weekend of the school summer holidays.  This gave me a chance to snap another one for the hunt - unfortunately the crowds were too big, the queues were too long and our feet were too tired for the juggler to be either me or mine!

Photo - Someone having a go at juggling
#14 - Someone Playing With A Ball
We had a super time in Warwick; I wish we'd made it there when the children were smaller, they'd have had a lot of fun too. Child No. 3 also thought it was great but gave the biggest thumbs up, not to the demonstrations of the enormous trebuchet (my original hope for #14), but to the splendid jousting show which featured ... several more horses!

Photo - Jousting at Warwick Castle
An extra go at #9 - More horses
Mel managed her entire Scavenger Hunt within a week.  I'm pretty chuffed that I managed to get a third of my items (and it could have been several more) within a weekend. The astute amongst you will notice that there are ten photos here too ... so that'll be why I've hooked up with Shimelle's Ten on the Tenth as well!

Saturday 8 September 2012

CHA Fakery #1

Photo Collage - Prima Lyrique Flowers & my fake flower
This month over at the Counterfeit Kit Challenge Blog we were asked to pick things from this summer's CHA to counterfeit and include in our kits.

My first stop was Pinterest to see what other people were liking and if there was anything that I could forge with supplies to hand.

Prima's Lyrique flowers looked like they might be do-able so I searched for other people's tutorials for 5-pointed felt flowers.  {I'm lazy and there's no point in re-inventing the wheel OK?!}  Unfortunately I couldn't find anything that matched, so I grabbed some felt scraps and got playing.

My first attempt was nearly there but not quite (even if had added the central pearl).  My second attempt was better and I'm sure that further work could get even closer to the original, but I'm happy to leave that to the rest of you.

So here goes:
You need 5 pieces of felt, one for each petal - mine are cut from 1" x 1¾" rectangles (2.5cm x 4.5cm) and form a flower 2¼"-2½" across (5.5cm-6cm).  Cut the one end of a felt rectangle into a point and cut the other end into a semi-circle. Fold the semi circular end over so that the curved edge meets the base of the triangle formed by the pointy end. {Can you now understand why I took photos - far easier to understand!}

Pinch the folded end in half and secure with thread (or glue).  Repeat for the remaining petals and stitch (or glue) them into a circle.  Add some sort of decoration to the middle of the flower and you're done.

For my September Counterfeit Kit flowers I wasn't sure what colour I wanted in the centre so I simply popped in some brads which I can swap around later if required.


Do let me know how you get on if you try making some yourself.

Thursday 6 September 2012

CHAnging The Kit For September


Welcome to the September Blog Hop from the Counterfeit Kit Challenge Blog Master Forgers.  Hopefully you popped over from Crystal, but if not, the hop started here, where there's a full list of participants so that you don't miss anyone's take on this month's kit-to-copy  from Birds Of A Feather.

As ever, I have NONE of 
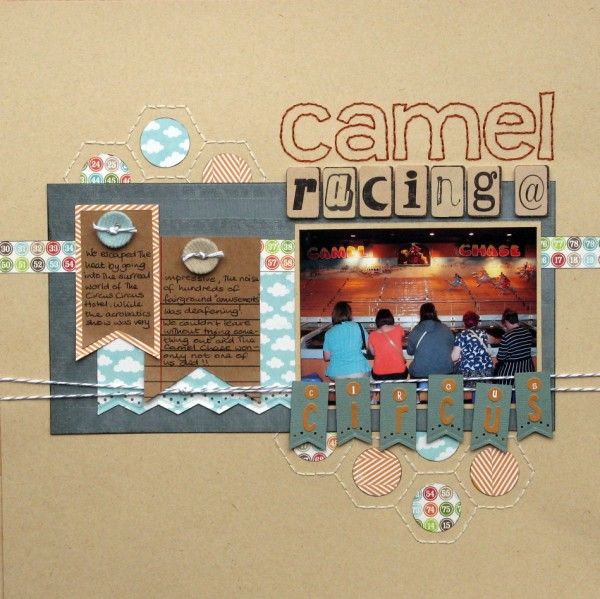
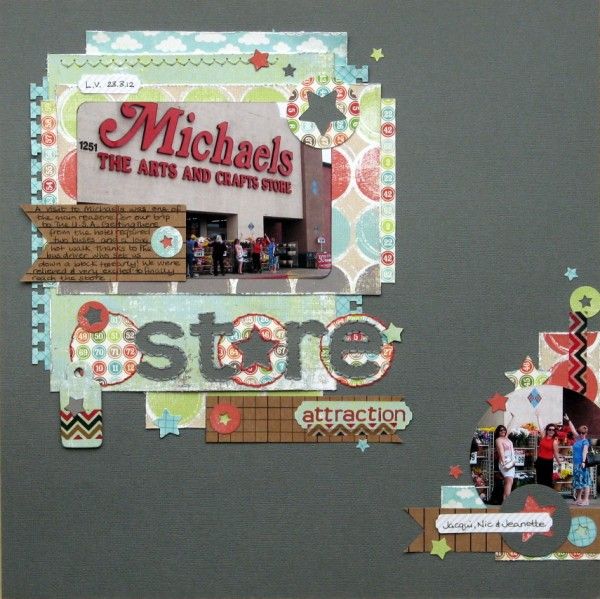
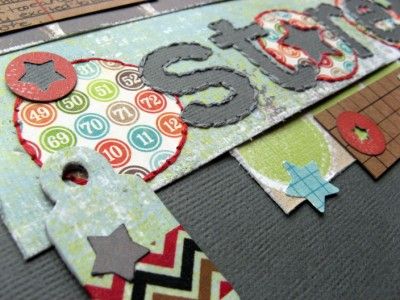
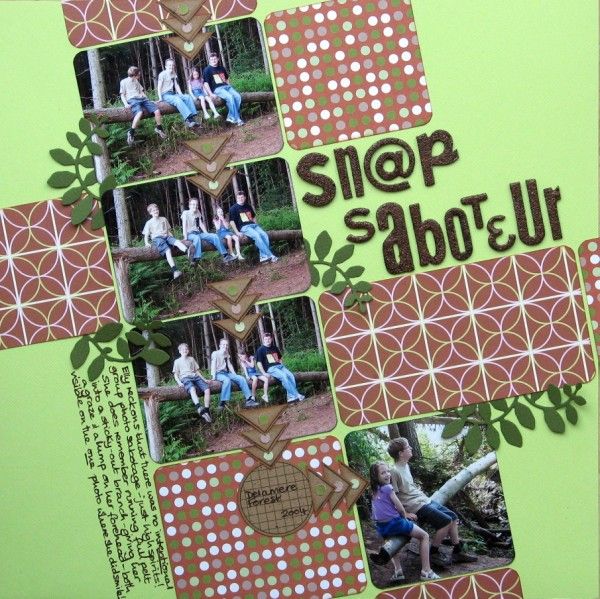
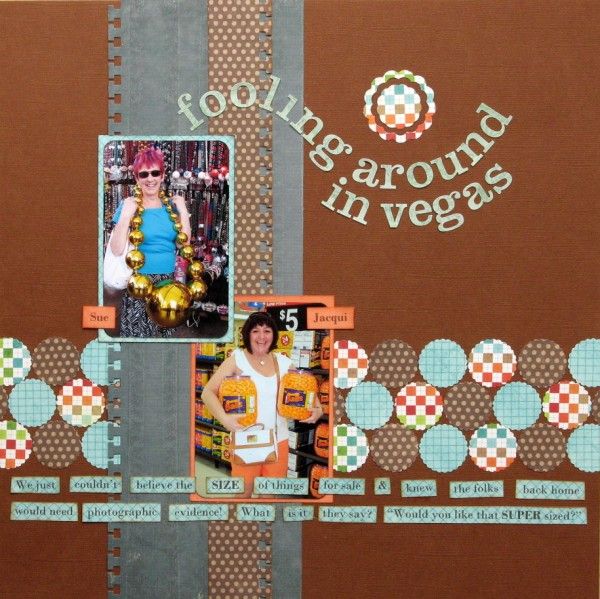
the original kit, so I started by seeing what I had that echoed something from the kit-to-copy and found a paper that 
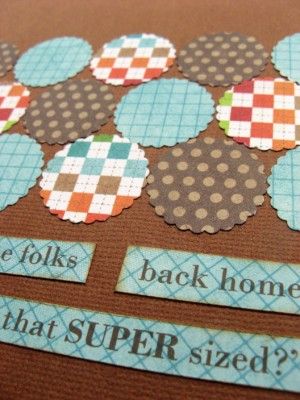
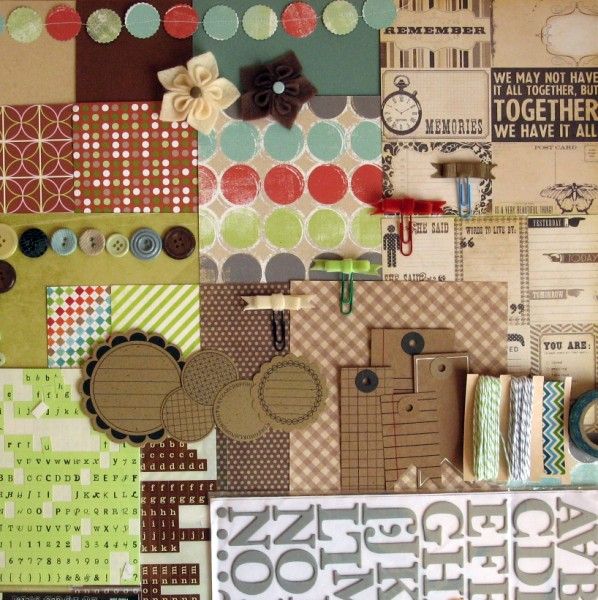
had a similar overlapping circles patchwork pattern and some green ledger lined paper too.  The spotty papers came next and then it was a question of matching the shades with other papers, cardstock and embellishments.  I have several 6x6 pads that need using, so I grabbed some sheets from them for extra colour as well a neutral journalling spots.

Counterfeit Kit - September 2012 - Jimjams

My supply list:
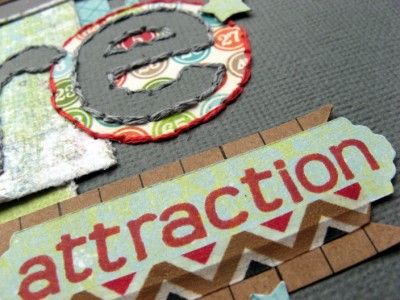
American Crafts Kraft, Bazzill brown, Coredinations Kraft-Core Teal cardstocks
Her Own Wings Creativity by Dream Street Papers
Sly Fox from Piggy Tales' Gingerbread Man Collection(peppermint green on the reverse)
MME's Decked Out Dots (peppermint green/teal on reverse)
Dream Street Papers Clubhouse Dungarees (the green ledger & circle is the reverse of  a denim effect pattern)
4 sheets from MME's Lime Twist Fly A Kite 6x6 pad
2 sheets from Simply Stories Documented 6x6 pad
Jillibean Soup Kraft journalling sprouts
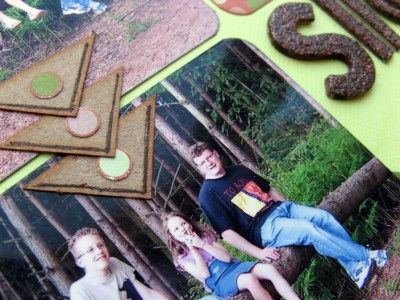
Various buttons from my stash
Green & white twine, Grey & white twine and Papermania chevron washi tape
MLS Mini Alphabet Stickers in Mint
Cosmo Cricket Tiny Type alphas
American Crafts Text Thickers in ash

We were also asked to counterfeit some of our favourite items from the Summer 2012 CHA to add into the kit:

Kit detail - Summer 2012 CHA forgeries by Jimjams
My tutorials here, here and here
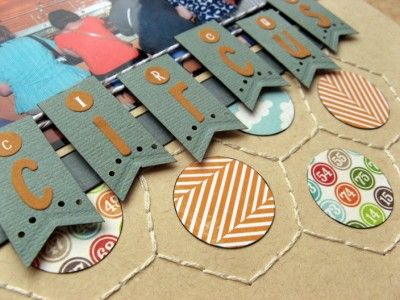
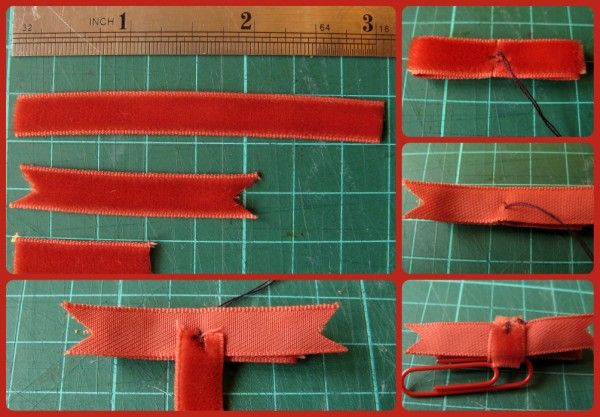
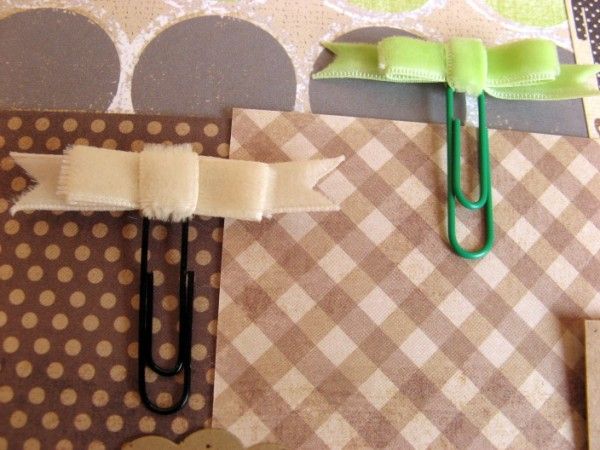
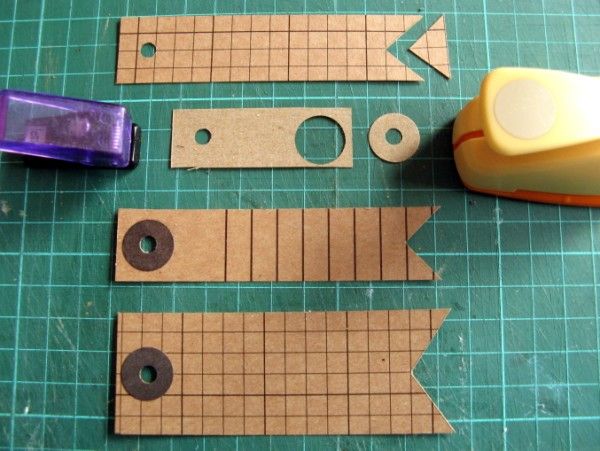
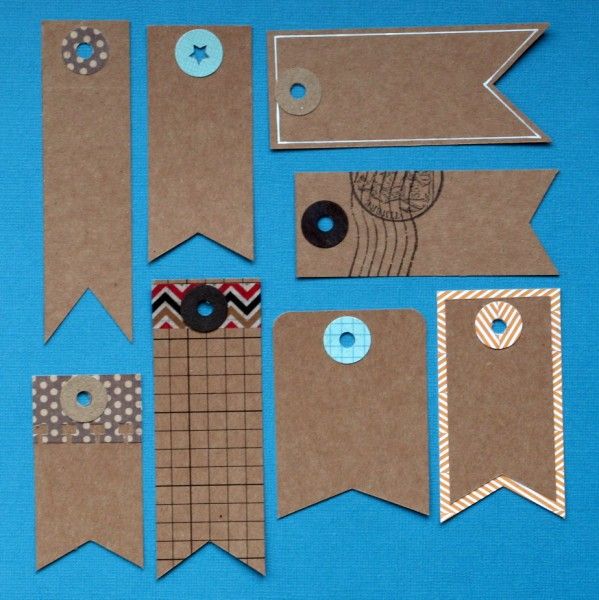
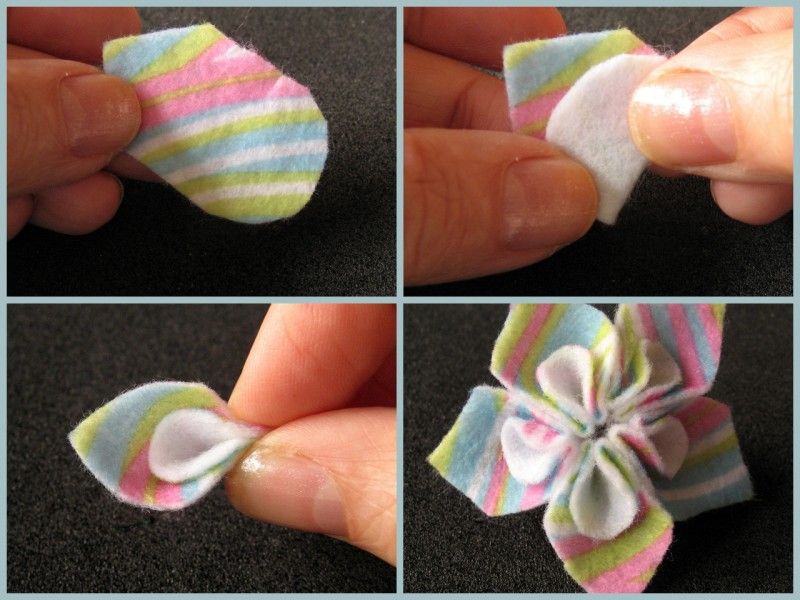
How about some forged flag tags in honour of those brought out by Jenni Bowlin Studio or some felt flowers in the style of Prima's Lyrique blooms or some of those ubiquitous sewn banners made from one of my patterned papers, or some Studio Calico fancy paperclips (though I think that they may have been from the previous CHA :oD ... I never was exactly abreast of the latest trends).

The next Master Forger to share her take on the monthly kit (and counterfeit some CHA goodies) is Julie-Ann so please hop over there to see what she's been up to this month.

Tuesday 4 September 2012

Signs Of Sixth Form

A very short Sunday Story (on a Tuesday) from me - as Child No.3 starts Sixth Form.  She's stayed put at her (all girls) school where they treat the Sixth Formers as a separate "college" and there may even be boys from the equivalent boys' school college in some lessons.  Although the boys still have to wear uniforms, the girls do not.  The girls are allowed other liberties too; for example they no longer have to keep to "natural" hair colours and then there are their nails:

Photo - daisies on grass nails

I might have known Child No.3 would get out her nail art pens and do something creative for her first day!

Want more school-related stories?  Or school-un-related stories? Check out the rest at From High In The Sky