1. You need three lengths of ribbon: approximately 3", 2" with pretty notches cut at each end and 1" or enough to wrap around 3 layers of ribbon. My rather shabby looking mat is marked out in centimetres for my more modern & European readers! I've used a velvet ribbon so that the front and back of the ribbon is hopefully easily distinguishable :o)
2. Fold both ends of the first and longest piece to the centre and sew in place - I've used black thread for clarity but it won't show anyway.
3. Add the second notched piece "face" down onto the looped ribbon and sew in place.
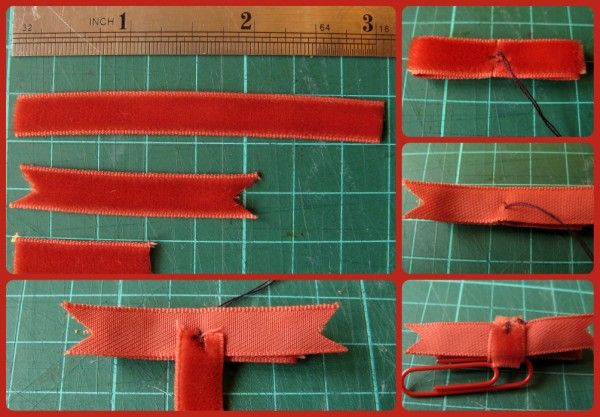 |
| Collage made with Picmonkey - my new favourite on-line application! |
5. Slot a paperclip through the loop made by the final piece of ribbon and use to embellish your project.
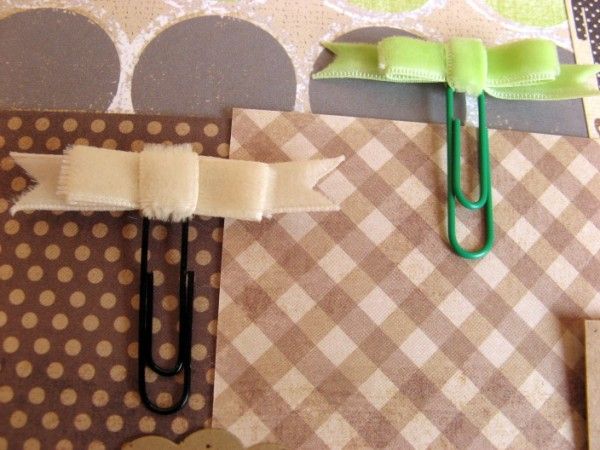
A quick question for you: when you add a paperclip to your pages which bit do you leave showing - the long or the short part? Or do you attach it so that the whole paperclip shows? I actually like all the paperclip to show but then it isn't clipping!
14 comments:
Thank-you for the instructions - I could see using these on gifts too, I usually leave the long end showing, unless it's getting in the waqy of something visually and then I might use the short end. :)
Great way to tie the bow (better than mine as doesn't involve cutting into the ribbon) I always use the long end showing.
Great tutorial, clear and concise!
Thanks Jemma, off to make some fancy paperclips....
And just for the record I like seeing the long bit ;)
Now that's a great question - I've always wondered what other people do too. I usually "clip"
I love these prettified paper clips - it's a very nice tutorial Jemma
Those are so pretty!!! Thanks for showing how to make them! I'm with you - I like the whole paperclip best but have a hard time displaying it that way since it's not doing its job. LOL!
Great tutorial, love the finished look!
These paperclip bows are lovely made with ribbon. They are perfect for Christmas gift tags. Thank you for a great demonstration.
great tutorial - they are really effective. I clip and have short bit showing!
I made mine just by tying a bow. Puddle Duck has commandeered half and, although I have tried - I just can't manage to use the rest. they just don't look right!
I've done much simplier ones for various projects - used a bunch of beads and fimo on a set many years ago. When I use them I like to actually clip - practical woman that I am. Depends on which looks better on each project as to if the short or long.
Great how-to. I usually clip, but I have the same frustration that you do that it covers too much up.
This was grand! Very clear photos & instructions :~)
I don't like using paperclips on my layouts because I get that weird bulge that misaligns everything!
Never thought of not clipping them - what a great idea!
How funny I just started catching up on blog posts because my medicine has my sleep all messed up and what else do you do at 5am?, anyway, I was going to blog and then try making some fancy clips. And now here are your instructions-thanks!! I saw a way to fold the clip into a heart shape, I'll try it and post it if I can figure it out :).
Post a Comment