A seasonal post from me today with thanks to Child No. 3 and her German teacher who taught her, in German, how to make an Origami Pumpkin ... and we thought we'd share with you! My German is a bit rusty so I've taken photos and will do the writing bit in English :o)
First fold a square of paper right sides together in half and press the crease line. Then fold it in half in the other direction so that it is divided into 4 smaller squares. Turn the paper over and fold it in half across both diagonals - to give mountain folds on the diagonals and valley folds across the sides as shown.
Then "squash" the paper together to form a triangle - this probably has some official name in Origami, but my daughter didn't know it! The next step is to fold the two side points up towards the centre and crease the fold lines sharply. Turn over and repeat to form a square as shown.
Now fold both side points towards the centre line and crease the fold lines. Turn over and repeat to form a lozenge shape. The next part was trickier to photograph, but is simple enough to do: there are loose flaps at the top and side pockets formed by the folding ... slot each loose flap as far as it will go inside the pocket.
Repeat for each of the four loose flaps and press flat. Fold the visible sides of the pumpkin together to reveal a nice flat surface and draw a face - keep it within the centre of the lozenge shape so that it stays in the round part of the pumpkin. Finally find the hole at one end of the lozenge shape .... and BLOW! The pumpkin will magically inflate and you're ready for the next one!
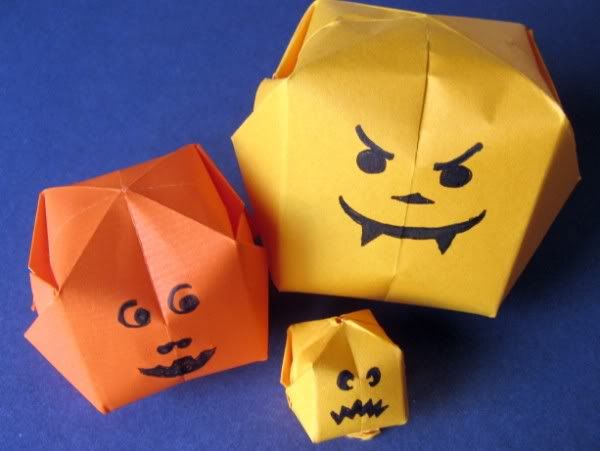 |
| Herr Kürbis, Frau Kürbis und ihr kleines Baby Kürbis |
When drawing the face you have a choice of having the blow-hole at the top or the bottom - if it's at the top the pumpkin sits a bit flatter on the surface (but needs propping up for a photo at this angle, like the "baby" in the photo); a blow-hole at the bottom means it can roll around a bit more, but looks better on the top. I leave that up to you!


4 comments:
thanks Jemma, have shared it with the Buttoneers and with the Scrappycats, but I forgot to leave a comment here then.
Your making waterbombs...LOL I made them for my ART CSE yes alongtime ago, well done.
Very cute idea.
Very cute - I particularly like the faces you've drawn! Thanks for your view on teal/jade etc - that made sense to my befuddled brain :)
Post a Comment