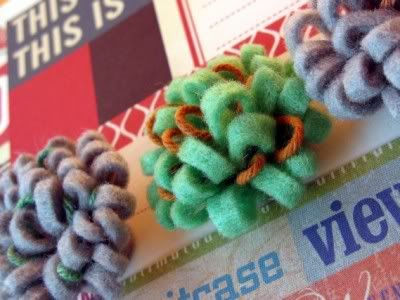
This tutorial from Sara at Craft Snob was the nearest I could find but wasn't that close to the BG original. However with a couple of minor adaptations I have come up with what I think is a pretty close approximation for the pompoms in the kit.
For a 1½" (38mm) wide pompom you need a strip of felt measuring 3½" (9cm) long by ... well that depends!!
The width of your strip of felt needs to be twice the width of your roll of double-sided tape plus 1" (2.5cm). So with a narrow tape (⅛") the strip measures 1¼" and with a wider one (½") it measures 2".
1. Stick the tape along one long edge of the felt. Fold it in half lengthways so that the long edges meet and a tube of sorts is formed. Stick another strip of tape along the long edge (but don't remove the backing paper yet).
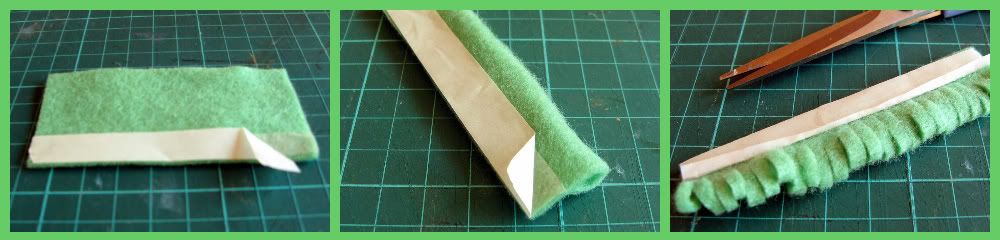
2. Make lots of ½" (13mm) cuts into the folded side of the strip (stopping at the edge of the tape) - these will form the loopy bits of the pompom. Mine are about ⅛" (3mm) wide.
3. For the coloured string I used the spare string from a parcel tag and coloured it with one of Child No.3 's Promarkers. Embroidery thread would work too ... or thin yarn ... My parcel tag string was 10" (26cm) long.
4. If you've used wider tape you can now trim your felt strip along the taped edge so that the tape strip is about ⅛" (3mm) deep. This will help to reduce the height of the finished pom pom.
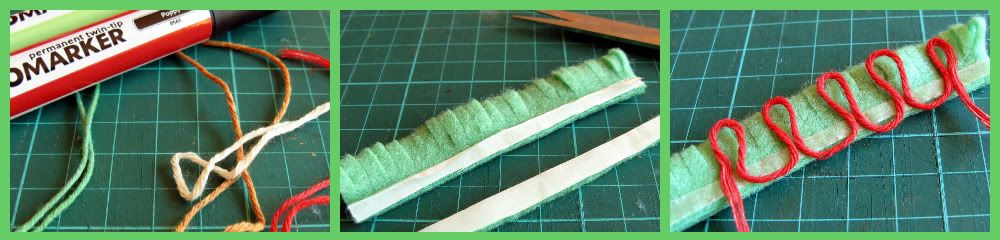
5. Stick the coloured string to the exposed tape in loops about 1" (2.5cm) in from one end of the felt strip.
6. Roll the felt strip up tightly, starting at the end with most string stuck to it.

These are super-quick to make - I decided I needed a smaller pompom than my kit samples for a page I was making at my crop on Saturday and it took maybe 2 minutes to make one with a 2" (5cm) strip of felt (though I didn't add the contrasting threads).
 |
| Some memories from my days as Girl Guide in the Swallow patrol as told here. |
17 comments:
Love the layout Jemma! It's perfect for that photo, and the smaller pompoms work really well.
Rinda
So cute...you are so ingenious (sp???)
thanks Jemma they are super will have a go at them today hopefully that may be a good thing to do at tonight's crop
Great tutorial, I love those pompoms.
I was just thinking, 'Oh that would be a good layout to pin to my board' then I saw you'd mentioned it underneath! Thanks for that. Those colours work perfectly with the photo.
You're on the board now: http://pinterest.com/notesonpaper/a-month-of-sunrays/
Julie :-)
Those worked out brilliantly - and I too often cannot wait the 2 mins it takes for the glue gun to heat - or rummage under the desk to find it :)
Great tutorial! I was wondering how you did the loops of floss!
So cute - thanks for the how-to!
The coloured string is the perfect "designer" touch, it lifts them to another level completely
Thanks for the tutorial..love the small ones on your LO!
Alison xx
Very nice, Jemma! I love the contrast of the felt loops and the string, also the nice complementary colours you chose. Better not tell BG - I think yours are nicer than theirs!
Oh my goodness, you are seriously clever! And your page is lovely and sunshiney!
Great idea - could be used to make a brooch too!
awesome tutorial. Hope I have some felt somewhere, I need to have a go at this!
My favourite bit was the amount of challenges you'd managed to fit into that one LO :)
Thankfully I don't have any felt so shan't feel obliged to have a go. But suspect whilst sorting crafting bits out I may find some this year and if so will come back!
great tutorial will have to give it a go. Loving the grey and yellow guide lo. When i read your story telling post i wondered if you would scrap your photo and here it is - fantastic.
These look amazing, and with half term here i might even have time to try some!
Thank you for the awesome tutorial!
Post a Comment